Kits Secret Guitar, Gear, and Music Page
Guitar stuff, gear stuff, soundclips, videos, Gilmour/Pink Floyd stuff, photos and other goodies.
Copyright Kit Rae.
VISIT MY SWORDS, KNIVES and FANTASY ART WEBSITE www.kitrae.net
THE BLACK STRAT PROJECT and Strat Setup Tips
Article written in 2008. Last update March 2020
SHIELDING TO REDUCE HUM AND EMI/RFI NOISE
RFI AND EMI NOISE - Skip to the next part if you don't care about knowing why Strats can be noisy and just want to get to how to reduce the noise. Strats are noisy by nature. I knew these single coil pickups were going to hiss and hum with a lot more RFI (radio frequency interference) noise and 60 cycle EMI (electromagnetic interference) hum than the noiseless pickups I was used to, so I decided to shield the guitar. So what is RFI and EMI noise and what causes it? It is difficult to determine which is which by listening to the hiss, hum, and buzz you may hear, but I will try to explain.
EMI, or electromagnetic interference, also called 60 cycle or 60hz hum, is a low hum or buzzing sound you hear. It is noise intruduced by your AC current frequency. It is essentially a magentic field, and your pickups work by sensing interference into their magentic fields. The most common AC magnetic fields are 60 Hertz fields emitted by electric power equipment. It usually does not change in volume when turning up your amp or down, but it can increase or decrease in volume, when you are in closer or farther proximity from an electromagnetic source, like flourescent lights, monitors, light switches, electric motors, computers et cetera. Sometimes the sound can go away when you touch the strings, when your body your body (which is also a reciever for EMI/RFI) is grounded by the guitar. Reducing this sound involves keeping DC lines away from your audio cables, and most importantly, having a properly a grounded power supply and having true filtered and isolated power supplies for your pedals and other outboard effects. Be sure outlets are properly grounded, using three prong plugs.
RFI, or radio frequency interference is typically in the 300Hz - 300 MHz audio range, and is typically described as hiss, although it can also sound like a low hum. It changes in volume as you move your guitar, which is acting as an antenna picking up this stray radio interference. RFI is a form of EMI, which is why you may see other sources referring to EMI and RFI as the same thing. Shielding your guitar is aimed at specifically blocking this RFI part of EMI. It will NOT eliminate 60 cycle EMI hum, or other forms of EMI interference. What it can do is reduce the RFI noise, and in some cases eliminate it. For some it barely reduces the noise at all and others may notice no difference at all (my Strat shielding eliminated some noise for me, but not all). It will vary depending on how nearby transformers or other sources of EMI/RFI are to you. Some people in bad locations will find this noise unbearable to play around, no matter how much shielding is done to a guitar. If you are one of those, I strongly suggest getting a set of Noiseless Pickups. Samarium Cobalt Noisless (SCN) and EMG-DG20 noisless pickups have worked well for me.
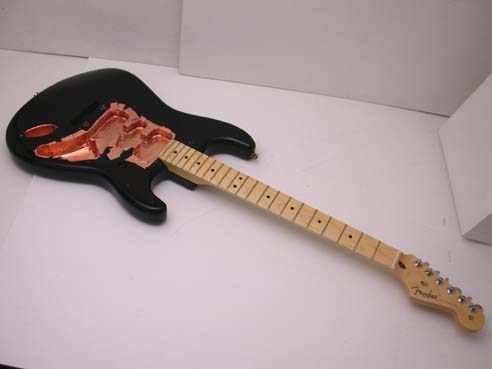
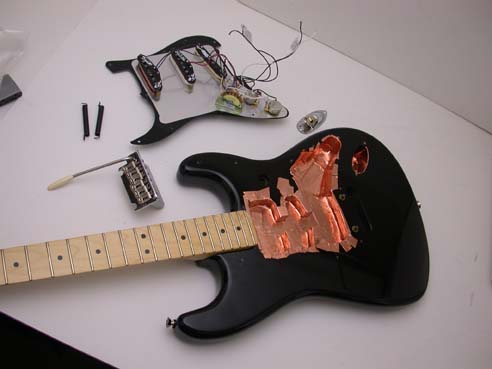
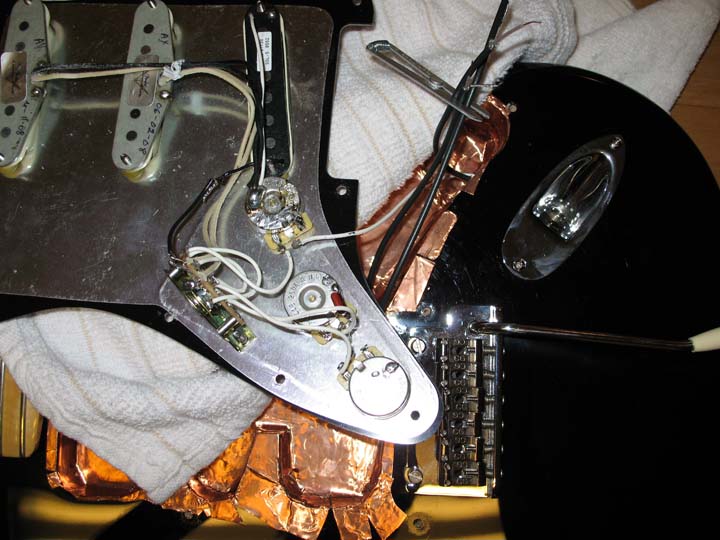
Copper shielding around your electronic components can block some of this RFI noise when the shield is grounded. There are many forms of non magnetic shielding material, like copper foil, copper (or cunductive) spray shielding paint, and copper shielding paint. The paint and spray versions can degrade over time and become less effective, but copper foil or sheet will not. I shielded the inside body cavity of my Strat with adhesive backed copper foil and used shielded wire for the ground wires, purchased from Stewart Macdonald (www.stewmac.com). I first removed the whole pickguard and unsoldered the ground wire that was welded to the spring claw, and the two wires soldered to the jack plate (remember which goes where!). This allows working on the guitar body without worrying that it, or the pickguard, will get scratched.
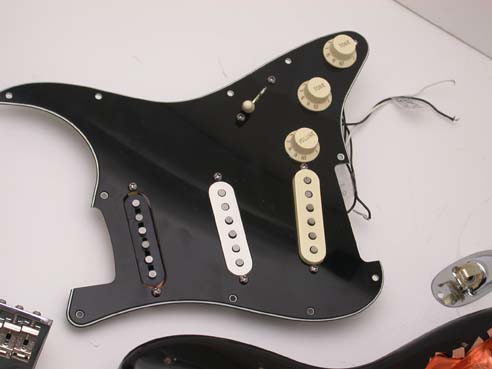
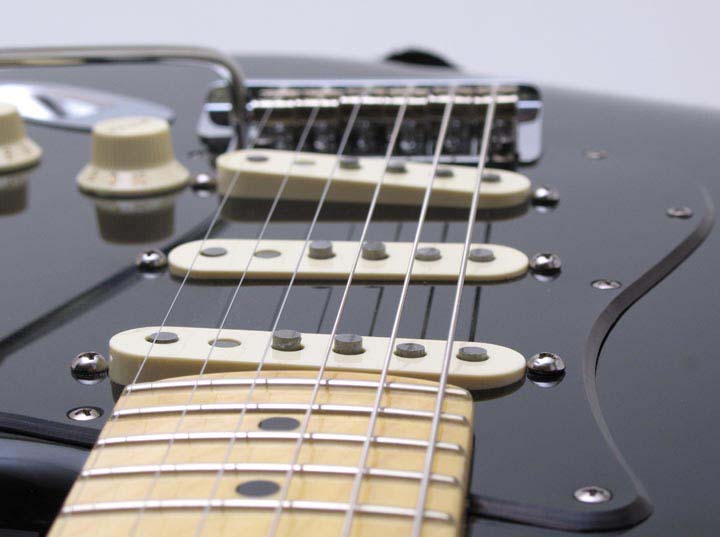
You are shielding the entire pickup and electronics cavity, and the underside of the pick guard, essentially creating an enclosed cage around the electronics to block the RFI. Many pick guards already have an aluminum or copper shield applied to the underside already. If yours does not have one, add it. You can see in the photos below that my stock Fender pick guard already has a silver aluminum shield. Note that is is not advisable to shield around the actual pickups themselves. Any metal in close prominity around the pickups can affect the magentic field, which can affect your tone. There is debate as to how much affect it really has, but I suggest not doing this so as not risking even a minimal affect on the way they are intended to function.
It is not necessary to shield the trelmolo/spring cavity since there are no electronics located there, and shielding the jack plug cavity is not necessary. If you do shield the jack cavity, be sure none of the jack metal, or the jack plug itself, contact the shielding. That can short your signal to ground.

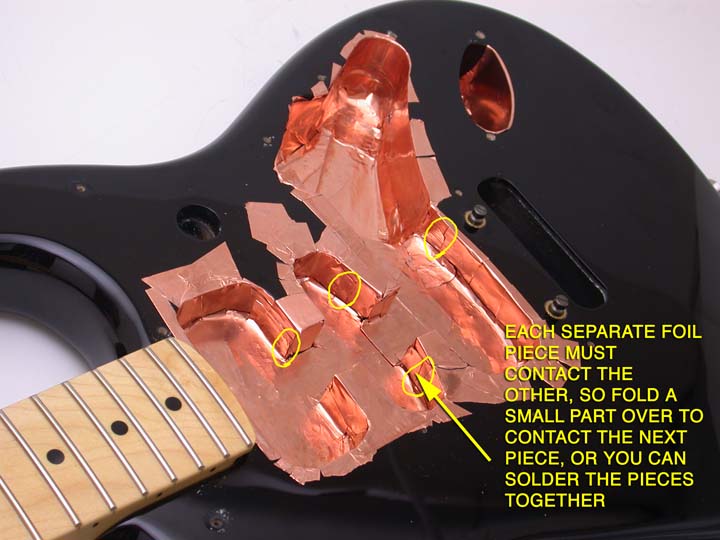
APPLYING THE SHIELDING - Applying the shielding in the guitar cavity is rather simple. All separate pieces of foil must have direct contact with each other, to create a continous ground. Some copper foil is sold with conductive adhesive backing. If you use copper with the non-conductive adhesive backing, fold a corner back when overlapping each piece, so you have a metal-to-metal contact. You can also melt a drop of solder with a soldering iron to connect each piece. The pix below show a very sloppy job, since this was my first time, but it accomplished the task. Note that I have copper wrapping out of the cavity onto the surface of the guitar body. This is to connect the cavity shielding to the shield on the underside of the pick guard. Only one point must touch it, but there must be a contact to create a continuous shield. After the elctronics are installed I will get into how the shield is actually connected to ground.
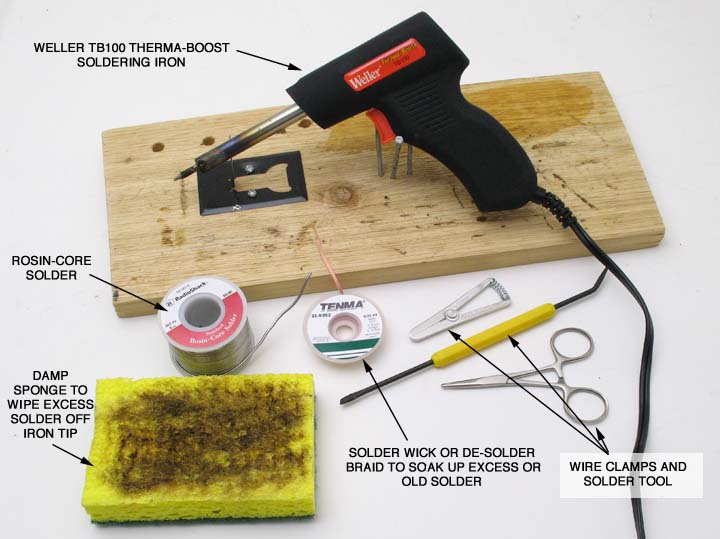
SOLDERING GEAR
I own a decent Weller Therma Boost TB100 soldering iron for repairing pedals. I bought it and my soldering supplies from Lowes and Radio Shack. You will need rosin-core solder, solder remover wick, wire clamps, and a damp sponge. Don't get a dirt cheap, low wattage iron. You need at least 30W to solder wire, but to remove the wires from the pots and spring clip, you really need 100-130W to heat up those big solder blobs, so higher wattage is better. The Weller does both wattages and it is only about $20. I had a cheap $12 gun, but it did not get hot enough to heat the pot solders in my Strat.
Learning to solder takes some practice, but it is worth it. I won't go through it here since simple lessons can be found on the web and youtube. If you have never soldered before, mess around with some scrap wire and scrap metal parts to get used to soldering before you try it on your guitar. Also, learn to desolder using the desoldering braid wick to soak up excess solder while hot, or clean up solder from parts you are going to resolder.
SOLDERING
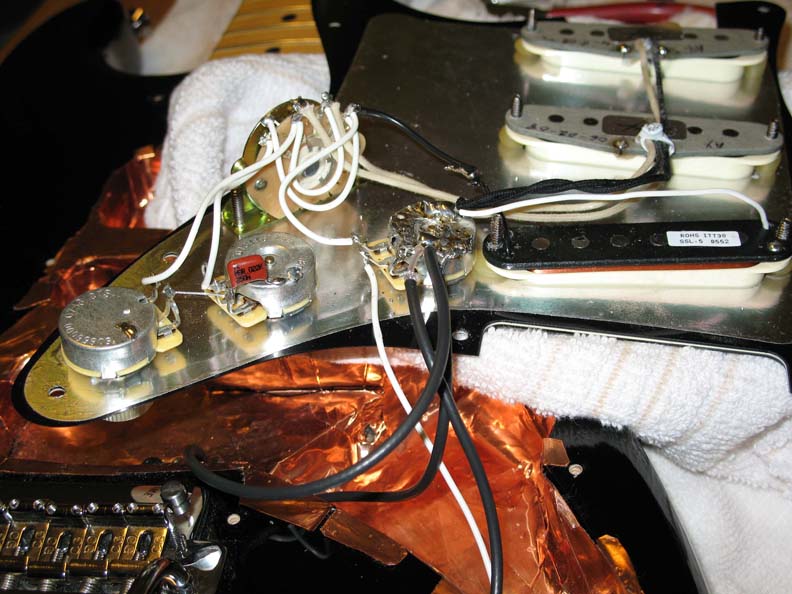
I downloaded a standard strat wiring diagram online from Seymour Duncan's website reference in case I could not remember what wires went where (click the image below to enlarge). I had already removed the whole pickguard and unsoldered the ground wire that was welded to the spring claw and the two wires soldered to the jack plate (remember which goes where!) so I could work on the copper shielding in the previous section. I used an old towel to cover parts of the guitar and pickguard where I was soldering to prevent any solder splash onto the finish. I unsoldered everything I needed to replace, removed the old pickups, installed the new ones, and then resoldered all the wires. I kept the wires as short as possible, so they pickup up the least amount of electromagnetic interferance.
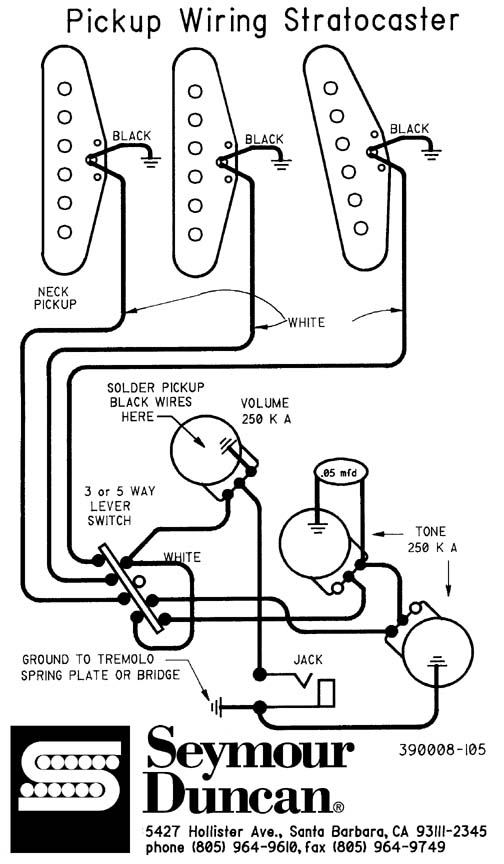
If you bought a standard Seymour Duncan SSL-5 pickup for the bridge position, it should be installed with the two wires soldered in the reverse position of the standard Fender bridge pickup. Just swap the black and white wires. If you have the reverse wound/reverse polarity Seymour Duncan SSL-5 use the reverse of what the SD diagram I have here shows for the bridge pickup wires. If you bought any standard Fender pickups, wire those using a standard Fender wiring diagram. You will know right away if you solder the leads wrong in the SSL-5, as the reverse polarity sound will be thin and and the volume will be very low in one pickup position.
As mentioned earlier, since posting this article several websites have have popped up selling complete loaded Black Strat pickguard packages. Overdrive Custom Guitar Works is one website. Prices are much higher than sourcing the components yourself, but if you don't want to fool with sourcing or soldering, this is a good option.


GROUNDING POTS AND THE GROUND LOOP MYTH - Some sources will say you need to remove the ground wire connecting all the pot cases together to prevent ground loops, implying that having more than one contact to ground from the same part is going to create a "loop" that will add noise to you guitar signal. This is actually nonsense and a misunderstanding of what a ground loop is. Ground loops only occur when two (or more) different pieces of AC powered equipment are connected together, and each circuit is grounded by a different ground - such as connecting two amplifiers to an A/B switch box, or daisy chaning the inputs of two different amps together, with each amp plugged into a separate grounded AC outlet. That is completely different than how your passive guitar circuit works. Everything (except the hot signal) in a passive guitar circuit like this can be grounded by as many points directly to ground as you want. It is just one circuit and all ground connections are going to the SAME ground, so you cannot create a ground loop.
The foil backing under the pick guard touches the pot casings when they are attached, so they are technically already grounded. The wires that are daisy chaned to each pot, then to ground, are just an additional ground point. If, over time, oxidization between the pot case the the foil pick guard backing separates the ground connection, you will still have that extra ground wire connection on the pots. Is it necessary? Not really, but depending on the environment the guitar is in, some people may eperience more oxidization than others over time. In my 30+ years of playing Strats, I have never had that problem, so I never bothered with the additional pot connection. David Gilmour has, as evidenced by this quote.
I always wire the earth through on my Fenders so I don't have to rely on that bit of silver paper underneath that the earth normally runs through on. I just connect the main body (pot casing) of the volume and tone controls to the outside of the jack plate so that my earth is connected. You often get Fenders cracking up and making noise. Say if the tone control and the volume control are slightly loose, it stops making such a good connection to the earth, which is running through that bit of silver paper which is stuck up on the underside of the scratch plate. So I always get rid of that. I don't take the silver paper out, but I hook up another wire - David Gilmour from a 1979 Steve Rosen interview for Guitar World

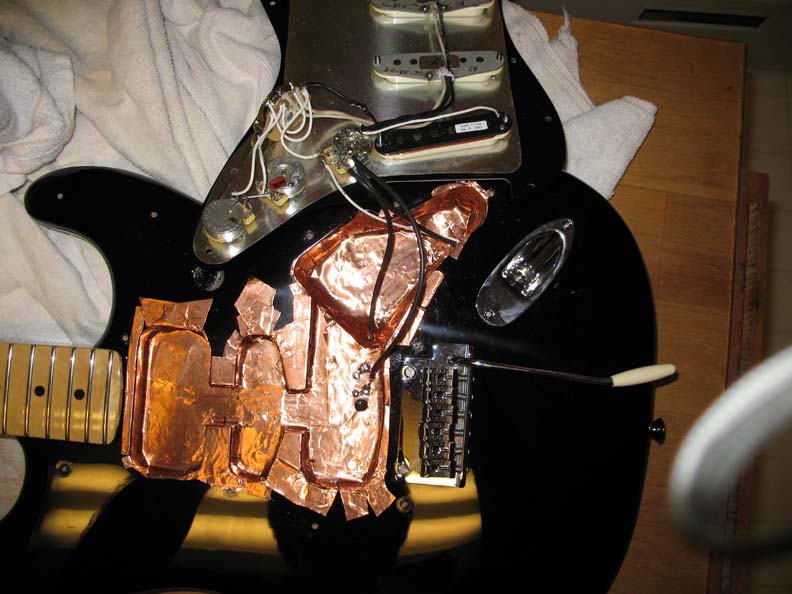
GROUNDING - Note in the middle and bottom right photos you can see the black grounding wire is screwed directy through the copper shielding into the wood in the bridge pickup cavity. That ground wire goes directly to the ground connection on the jack plate, grounding your guitar. The shielding must have direct contact to the ground wire. Running a screw through it is the best way to be sure that metal-to-metal contact is there. A drop of solder connecting the two also works.
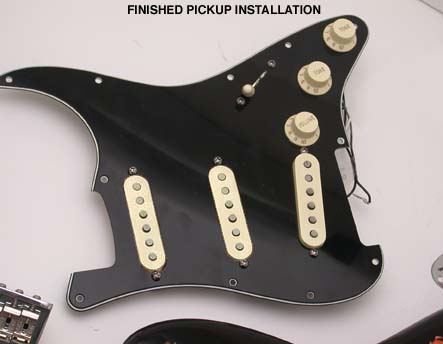
completed pick guard after soldering
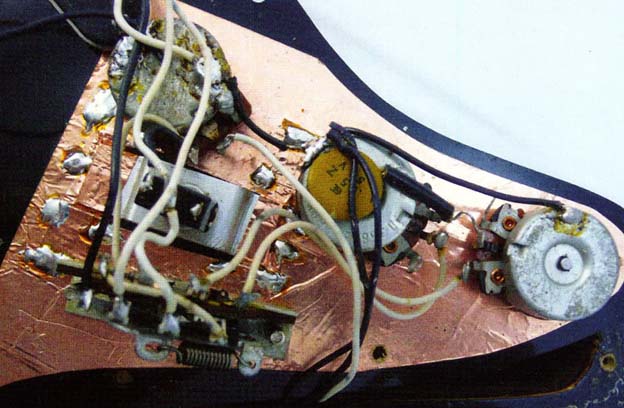
Gilmour's Black Strat pickguard electronics with "magic switch" installed
SETUP, STRING HEIGHTS, AND PICKUP HEIGHTS
The pickups and string heights will vary from person to person depending on how hard or light you pick, how high you like to bend the strings, guage of strings used, and the type of gear you are using. Ideally you want the best string separation when strumming chords. Not too boomy or muddy tone on the low strings, but not too light either. Fender's suggested Strat setup instructions listed below are the best to use when starting out.
STRINGS - Gilmour uses GHS Boomers in non standard guage sets for his Strats: 0.10, 0.12, 0.16, 0.28, 0.38, 0.48. GHS sells this (as of 2008) exact set as David Gilmour Signature Blue Set Electric Guitar Strings. I use extra light guage Fender Super Bullets: 0.9, 0.11, 0.16, 0.16, 0.24, 0.32. GHS Guitar Boomers in the extra light guage are also good, set GBXL.

STRING HEIGHT AND ACTION - Measured from bottom (underside) of the strings down to the top of the 12th fret, Gilmour's string height action is set 1.6mm on the treble side (high E) and tapers to 1.8mm on the bass side (low E). The G string is raised to 1.8mm. The spring tension action needs to be loose enough for a 1 1/2 step bend on the high E string at the 12 fret and a 2 step bend on the G and B strings at the 12th fret. This information came from Phil Taylor's Black Strat book.
Here are Fender standard string heights for various necks. Using ruler, caliper, or string height guage, measure the distance between bottom (underside) of the strings down to the top of the 17th fret. Adjust bridge saddles to the height according to the chart below. If you are not sure what your neck raduis is, here is a handy neck radius guage you can print and cut out. I keep my strings set very high: 3.0mm bass side, 2.5mm treble side.
Neck Radius____________String Height Bass Side_________String Height Treble Side
7.25"___________________5/64" (2 mm)_________________4/64" (1.6 mm)
9.5" to 12"_______________4/64" (1.6 mm)________________4/64" (1.6 mm)
15" to 17"_______________4/64" (1.6 mm)________________3/64" (1.2 mm)
NUT SLOTS - David uses a bone nut. Measured at the first fret beside the nut, the high E slot on the treble side is 0.25mm deep. The slots taper to 0.5mm on the low E on the bass side.
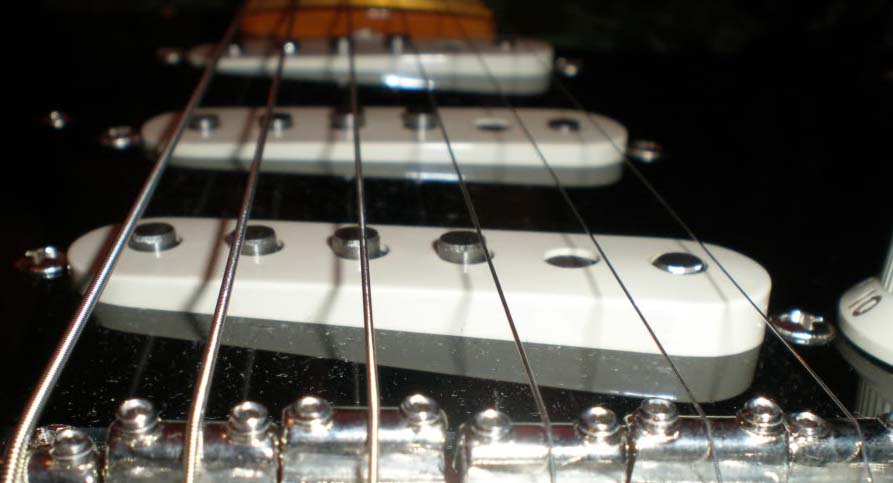
PICKUP HEIGHT - In general, lower pickup heights will add more definition to your sound, but with a drop in signal output. Higher pickup heights will remove some of the dynamics, but you will have a higher signal output. What you want is to have the volume be relaltively the same when switching between each pickup positions, so the heights need to be adjusted accordingy. Different guitars and different types of pickups require different heights, so just because you see a certain height on one of Gilmour's pickups, that does not mean it is the best jeight for your guitar..
Typically the the bass side of the pickups should be lower than the treble for an even string balance. Depress all of the strings at the last fret on the neck. Using a capo helps. Using a caliper or ruler, measure the distance from the bottom of the 1st and 6th strings (the treble and bass strings) to top of the pole piece. Rule of thumb-the distance should be greatest at the 6th string - neck pickup position, and closest at the 1st string - bridge pickup position. These are David's string height specifications from The Black Strat book, although I'm sure they have varied throughout the years.
Gilmour's Pickups____________________________Bass Side / Treble Side
Bridge:_____________________________________ 2.75 mm / 1.25 mm
Middle:_____________________________________2.75 mm / 1.7 mm
Neck:______________________________________2.8 mm / 1.5 mm
Below are measurement guidelines for various other types of pickups. The distance will vary according to the amount of magnetic pull of the pickup. I you find there is too much fret buzz, raise the strings slightly higher. Keep in mind that and string height adjustments may also affect the guitar intonation, so always check and adjust.
Pickup Type________________________________Bass Side / Treble Side
Texas Specials: ______________________________8/64" (3.6 mm) / 6/64" (2.4 mm)
Vintage style, such as the SSL-5 or Fender CS69: ___6/64" (2.4 mm) / 5/64" (2 mm)
Noiseless™ Series: ___________________________8/64" (3.6 mm) / 6/64" (2.4 mm)
Standard Single-Coil: _________________________5/64" (2 mm) / 4/64" (1.6 mm)
Humbuckers:________________________________ 4/64"(1.6 mm) / 4/64" (1.6 mm)
Lace Sensors: _______________________________As close as desired (allowing for string vibration)
Also see the SETTING UP THE TREMOLO AND SPRINGS section above.
 ...
...
The pickup heights of the DG Signature strat on left and my Strat on right. As you can see, we go beyond the Fender standards by lowering the bass-low E string side.
PREVENTING A LOOSE TREMOLO ARM
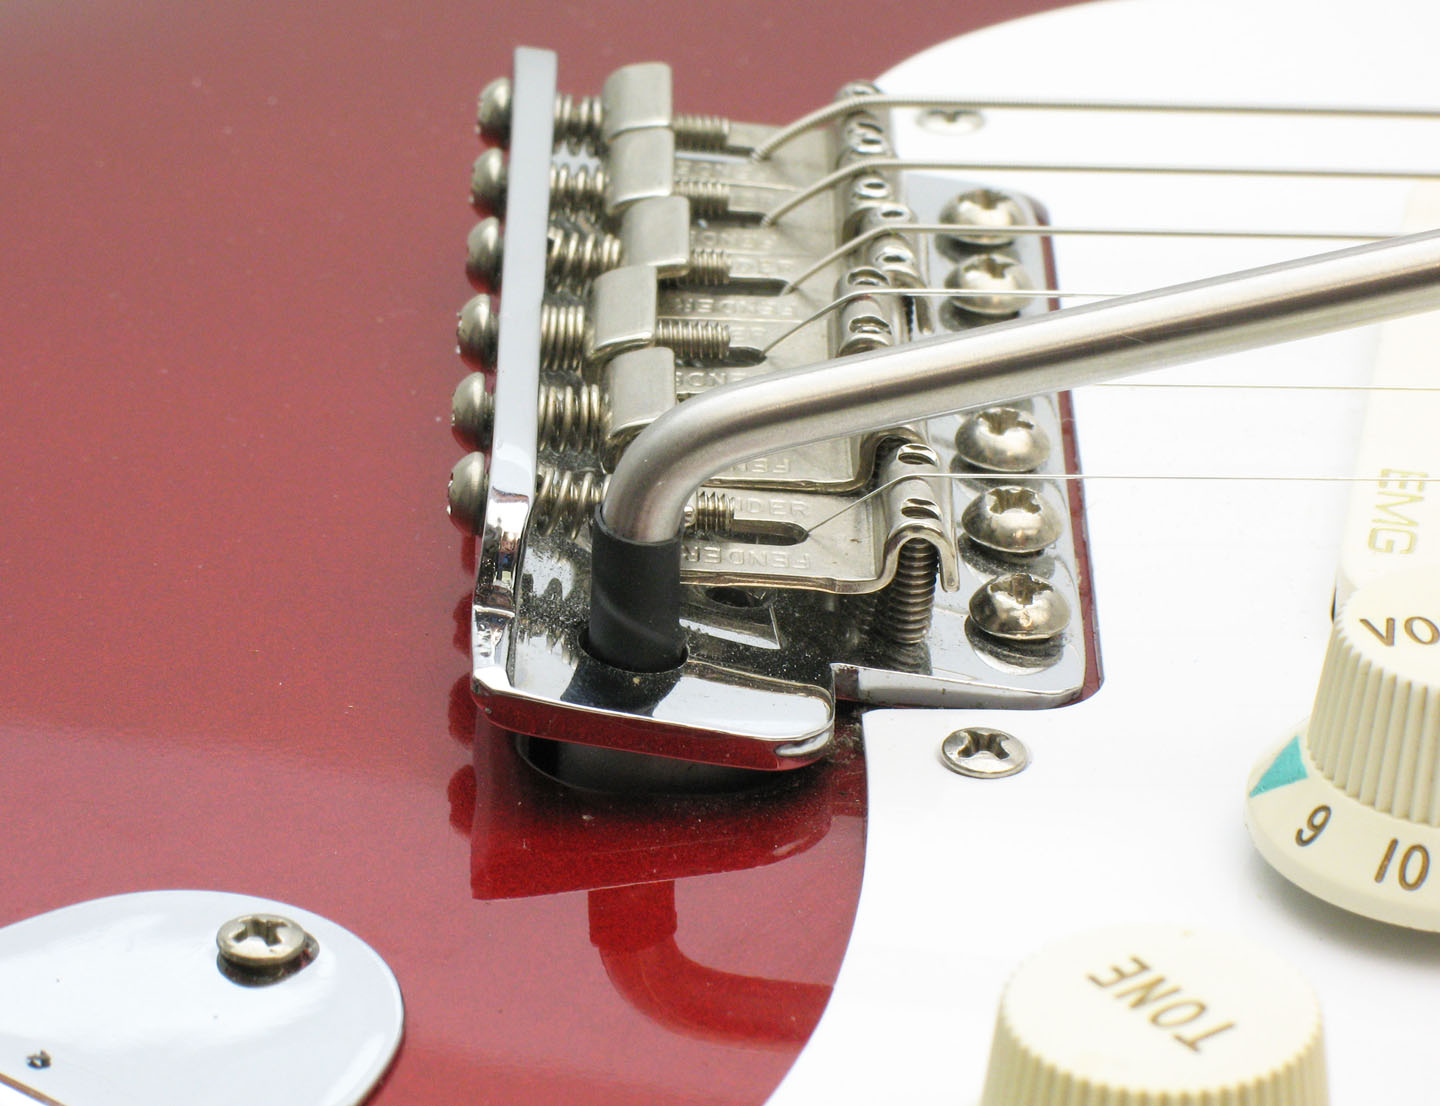
Strat tremolo arms are notorious for becoming loose and wobbly in the tremolo block. Some get so loose in the tremolo block hole that they produce an audible rattling sound from metal hitting metal when you rock it back and forth. Some arms are loose because the bridge plate holes and block holes never had very tight tolerances to begin. On others, the threads simply wear out over time. This is not good for someone doing Gilmour style tremolo. Most people simply wrap the threaded area of the arm in plumbers tape, but that quickly wears out and needs frequent replacing if you are a heavy tremolo arm user. A more longer lasting solution is to use heat shrink tubing, the type used to cover and protect wire solder joints, like you see inside some hand made and production guitar pedals. It is easily available online or anywhere that sells electronics or soldering supplies. You simply heat it and it shrinks around the steel bar.
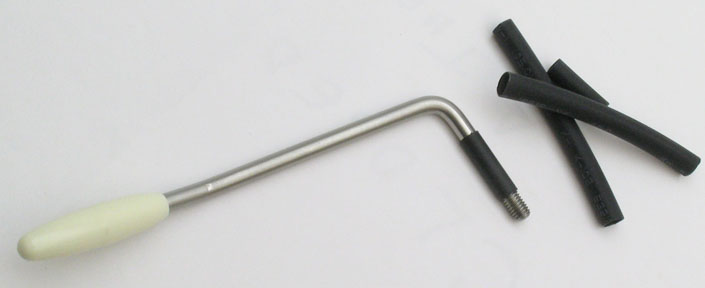
You want a shrink tube diameter slightly larger than the diameter of the tremolo arm. Most American Strat arms are around .188" (4.78mm) thick, so use 3/16" or 5.0 to 6mm heat shrink tube. Mexican and Japanese Strats arms are usually 5mm, so use 1/4" or 6.0 to 6.5mm heat shrink tube. Cut the length long enough so it extends from the top of the threads to just outside the bridge plate hole, as shown above. Heat the tube with a heat gun or hair dryer until it shrinks, then re-install into the bridge. The arm will fit tight, so you may have to press hard when first threading it into the hole. Cut off any excess tubing that extends above the bridge plate, if desired.
THE FINISHED STRAT
After reassembling the guitar I put on new strings, stretched them, and tuned up. I reset my pickup heights and corrected the twelfth fret intonation, which had changed since I adjusted the saddles and tremolo. It plays and sounds incredible, and I feel it is much more “my” guitar, having assembled it myself, rather than buying a Fender Signature Series Custom Shop replica for over double what this cost me. I also did not have to worry if I would like the neck or setup, since I set it up the way I like it. The Black Strat was a rewarding project and this has become my favorite guitar.
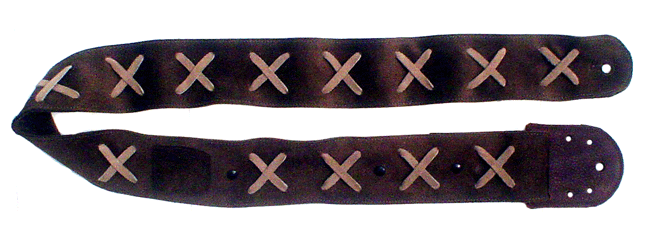
I mentioned at the beginning of this article that David's guitar strap for the Black Strat was one used by Jimi Hendrix, bought for David's 60th birthday by his wife, Polly. My wife heard that story and bought a replica of that same strap for my birthday about a year after I built this. Similar straps can be found (as of 2009) in several places including Hell For Leather and Jeri Designs. It looks good and is a very comfortable strap and I highly recommend it. It may not make your guitar or playing sound any better, but I believe if you feel good about your instrument and accessories, it does affect your playing in a positive way.
The total cost for this project was around $1400 (built in 2008). Here is what it sounds like using a Big Muff into various amps and speaker cabinets.
Black Strat Sound Clip - Hey You Solo
Black Strat Sound Clip - Shine on Blues
Black Strat Sound Clip - On the Turning Away Jam
Black Strat Sound Clip - Comfortably Numb First Solo
Black Strat Sound Clip - Castellorizon
Black Strat Sound Clip - One of These Days

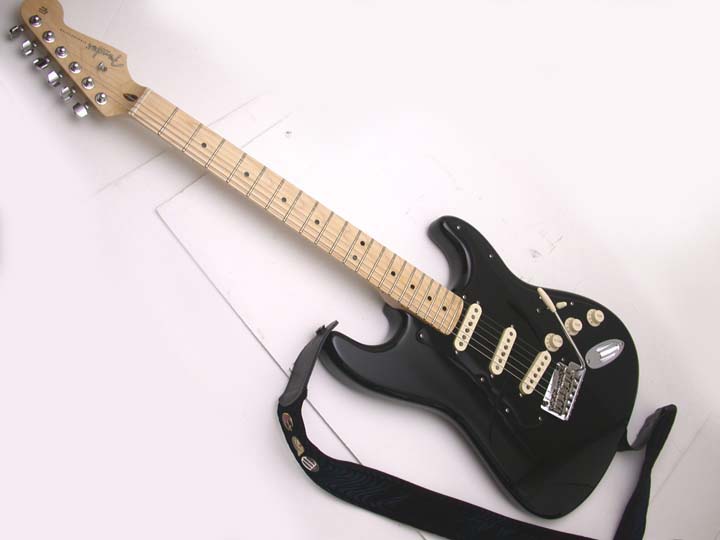
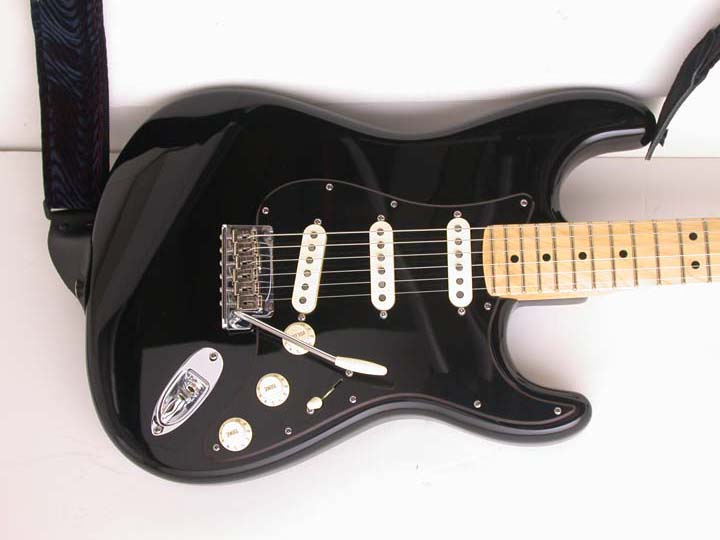
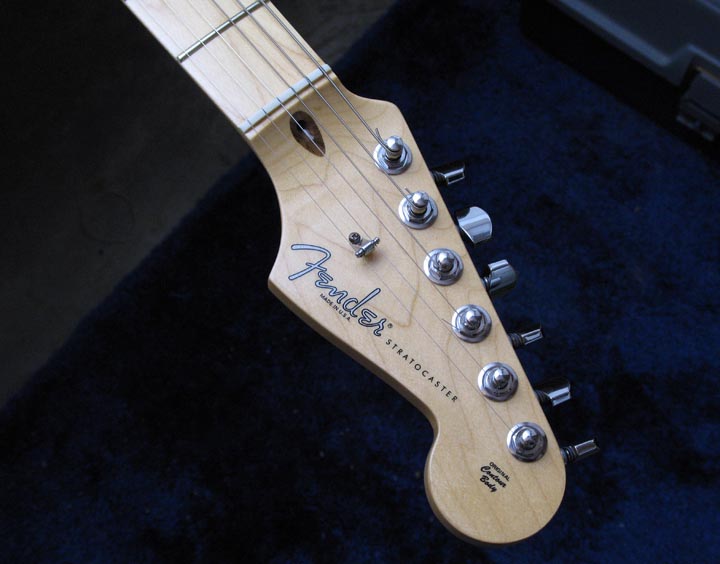

Photos of the finished Black Strat