Kits Secret Guitar, Gear, and Music Page
Guitar stuff, gear stuff, soundclips, videos, Gilmour/Pink Floyd stuff, photos and other goodies.
Copyright Kit Rae.
VISIT MY SWORDS, KNIVES and FANTASY ART WEBSITE www.kitrae.net
THE BLACK STRAT PROJECT and Strat Setup Tips
Article written in 2008. Last update February 2018
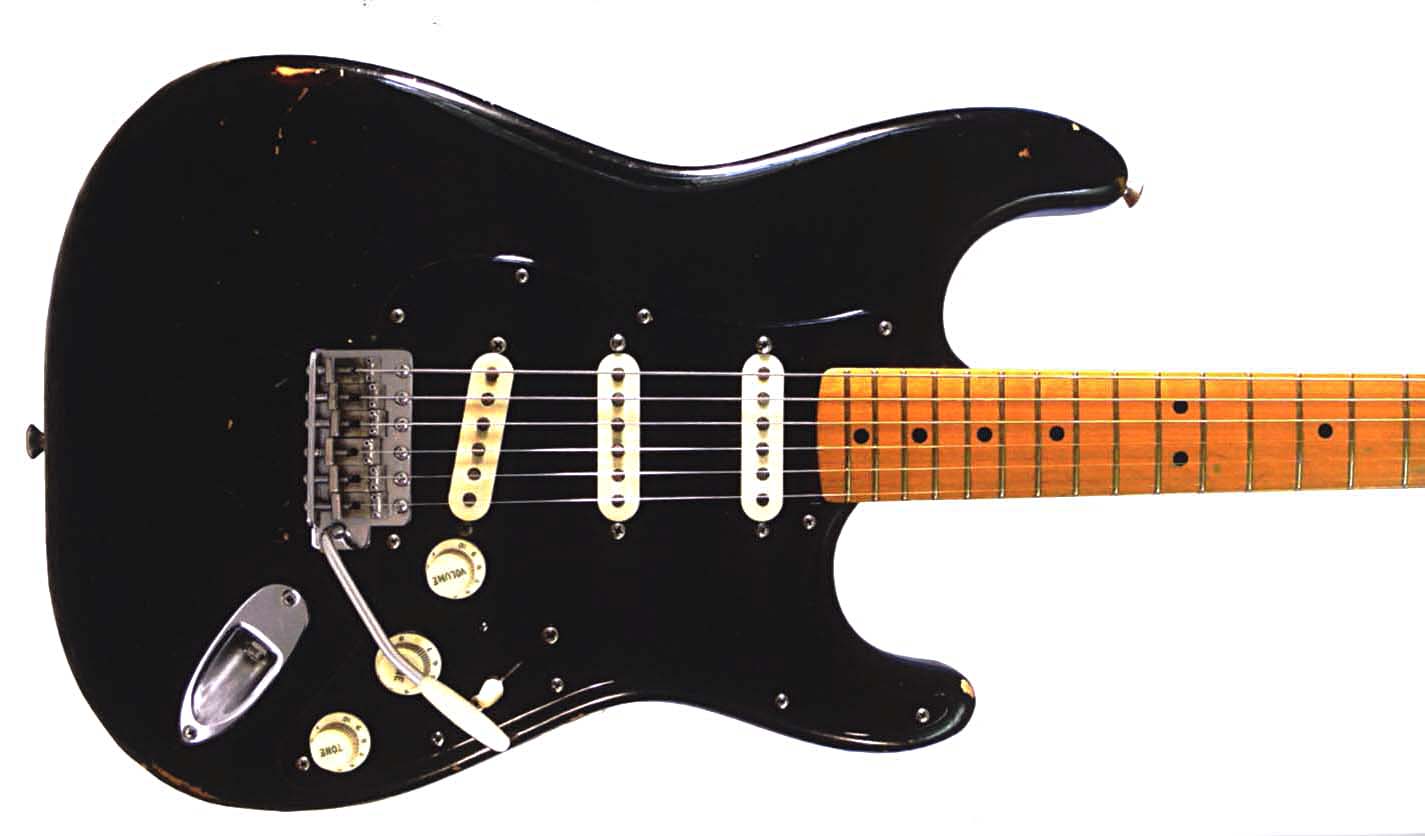
After playing various guitars for many years it became obvious that Fender Stratocasters were my favorites, and the guitars I played most often. They have a very comfortable feel and a very versatile sound. I liked different elements from each of the Fenders I have owned over the years, but I really wanted one that had everything I liked in one guitar, and those features were all in David Gilmour's Black Strat. I love his Pink Floyd tones, so I set out to assemble my own Black Strat using pickups similar to the ones David has used. I have researched David Gilmour's guitar quite a bit over the years, and though I think it is an excellent working guitar, I decided to assemble one with my own Strat preferences rather than just a straight copy of David's.
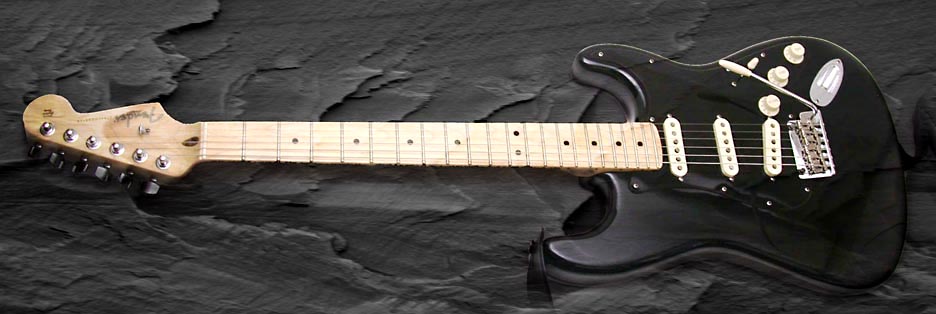
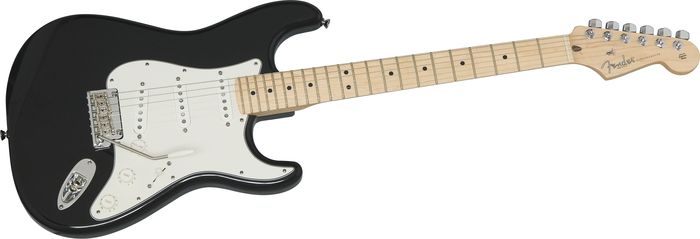
I always loved the look of the Black Strat - jet black body and pickguard with the stark contrast of white pickup covers and knobs. My first Strat was all black, so I wanted to keep that look. I like feel of the “C” shaped strat necks better than the "V" shape. I also like the feel I get from the maple neck on my Fender telecaster a bit better than the rosewood neck on my old '80s Strat plus, so I decided my new Strat would have a C maple neck/fretboard. Gilmour has used both, but long ago switched to a maple fretboard with a C shaped neck on the Black Strat.
For pickups, I have used bluesy sounding SCN (Samarium Cobalt Noisless - discontinued) pickups and Gold Lace Sensors in the past, but I wanted to try some more vintage sounding neck and middle single coil pickups, and a hotter bridge closer to what Gilmour uses. I have used the hot DiMarzio FS-1, but I wanted to try the Seymour Duncan SS-d David uses. I liked the bluesy sounding SCN neck pickup in my crimson Deluxe Strat, and I achieved a similar neck tone with the Lace Sensor neck pickup in my '80s strat, but they were not dead on to the sound I was after. I tried out several other vintage style pickups, including the ones Gilmour used.
Below is how I assembled my new Strat, step-by-step, including all the tips and gear needed for you to make one. Another great resource on building your own Gilmourized Black Strat is gilmourish.com. You could also buy one of the Fender Signature Series David Gilmour Black Strat replicas Fender produced in 2008 (discontinued), although at the time I wrote this those were going for $3500-4000. My budget was under $1500.

DAVID GILMOUR'S BLACK STRAT


PHOTOS OF THE VARIOUS INCARNATIONS OF DAVID GILMOUR'S BLACK STRAT
First, here is a bit of history about the Black Strat. David Gilmour bought this guitar from the famous Manny's Music store in New York City in 1970 as a replacement for several guitars which were stolen just six weeks prior while touring with Pink Floyd, including David's first black Stratocaster. This replacement was a late '60s model Strat with a factory black finish painted over an original sunburst factory finish on an alder body. It originally had a 21 fret maple neck. The guitar soon became David's main working Strat and has been extensively modified over the years. It has been fitted and altered with seven different necks, different pickups, electronics, knobs, tremolo systems, and pick guards, amongst other changes. Gilmour used this on some of Pink Floyd's most famous albums, including: Meddle, Live at Pompei, Dark Side of the Moon, Wish You Were Here, Animals, David Gilmour, The Wall, The Final Cut, and About Face.
In 1986 after sixteen years of hard use, David retired the Black Strat and it was loaned to the Hard Rock Cafe for display. In 1997 David recovered the guitar, which saw much abuse while on display, and had it repaired and set up to make it playable once again. He used it for the Live 8 Pink Floyd reunion in 2005 and as his main working guitar for his On an Island solo album and tour, featured in the Remember that Night, Live in Gdansk, and Live at Pompeii DVDs and CDs. In 2019 he sold the original Black Strat at auction, but he still owns a few Fender Custom Shop replicas.
At the time I wrote this David was using one of Jimi Hendrix's famous leather guitar straps on the Black Strat, a gift from his wife Polly for his 60th birthday. The strap that held the guitar that played Voodoo Chile was now also the strap holding the guitar that played Comfortably Numb. How cool is that? It does not get any cooler.
I bought it at Manny's in New York. I've always used it as a testing ground for trying all sorts of things out. It's had a few different necks on it. The original neck that came with it was one of those with the bullet thing for the truss rod and rather a larger headstock - I've still got that neck somewhere; my brother has it on a Telecaster or something. So there have been a few different necks on that Strat, and it has different pickups to what it originally had. Years and years ago, I met up with Seymour Duncan when he still lived over here in England and worked with the Fender company here. We picked three really nice-sounding pickups out of a box in which he had with tons and tons of Strat pickups. We rewound those three, and those are the ones that have stayed on it ever since. But I've always considered that to be my hodge-up guitar on which nothing is sacred...It's still a good guitar - David Gilmour from Guitarist 2006
A very good history of the Black Strat can be found in the excellent book "The Black Strat - A History of David Gilmour’s black Fender Stratocaster” by David's gear tech, Phil Taylor, published by Hal Leonard. Not many guitarists have a book dedicated to one of their guitars, which shows you just how special this particular Strat is to many people. It includes the complete history of the guitar and all of its modifications over the years, some history on Pink Floyd, as well as info about David's other guitars. Also check out Gilmourish.com for info on the Black Strat.

THE BASE STRAT
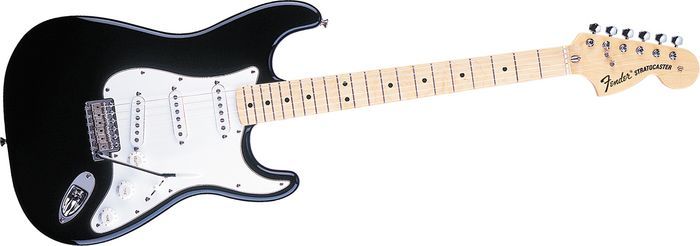
I tested several different Fender American Strats, including Standards, Vintage, and Classic series models, with both two and six point tremolo systems. I decided on a Fender American Standard neck and body, instead of a Classic or Vintage series Fender that is closer to Gilmour's, simply because the Standard is similar to the Deluxe Strat and Strat Plus that I have been playing for many years. Both of those have a two point bridge, similar neck shapes, and 22 frets. I have always heard the six point tremolos (six pivot screws) sound better and more vintage than the modern two point (two pivot scews), but in testing them I really heard no difference, at least for the music I play. I also prefer the “C” shaped necks with 22 frets rather than the skinny “V” necks with 21 frets on the older guitars and re-issues. I could have used a Fender Deluxe strat with better bridge and trem parts, but it was less expensive to get a Standard and buy better replacement after-market parts.
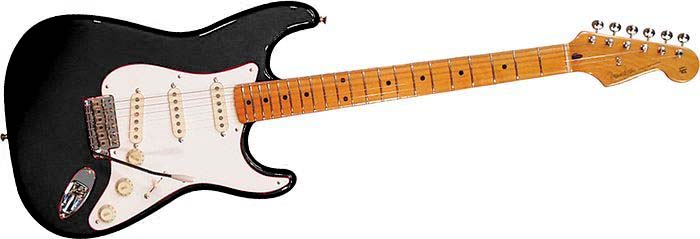
If you want more of a “vintage looking” Black Strat with a six point trem and amber yellow aged look to the enck, go with a Fender Classic 50s series (Mexican or Japanese made) or a Fender American Vintage '57 Series guitar, which has a tinted coating to resemble that yellow-aged nitrocellulose finish. Fender's Classic Vibe '50s Squire series Strat is another bargain buy to use as a base guitar to modify.
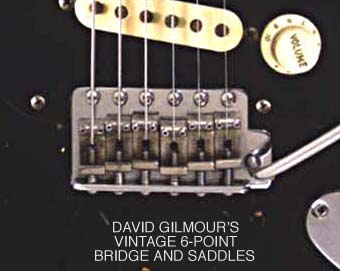
Gilmour's Black Strat has a 1969 alder body with a 1983 '57 re-issue 21 fret maple neck, C-shaped with a 7.25 neck radius and relief at 9th fret of 0.13mm (as of 2008).

Fender David Gilmour Signature Series Black Strat replica (NOS version)
Fender Classic Series Strat (left) and Fender American Vintage Series Strat (right) with six point tremolo
Fender American Standard Strat with two-point tremolo
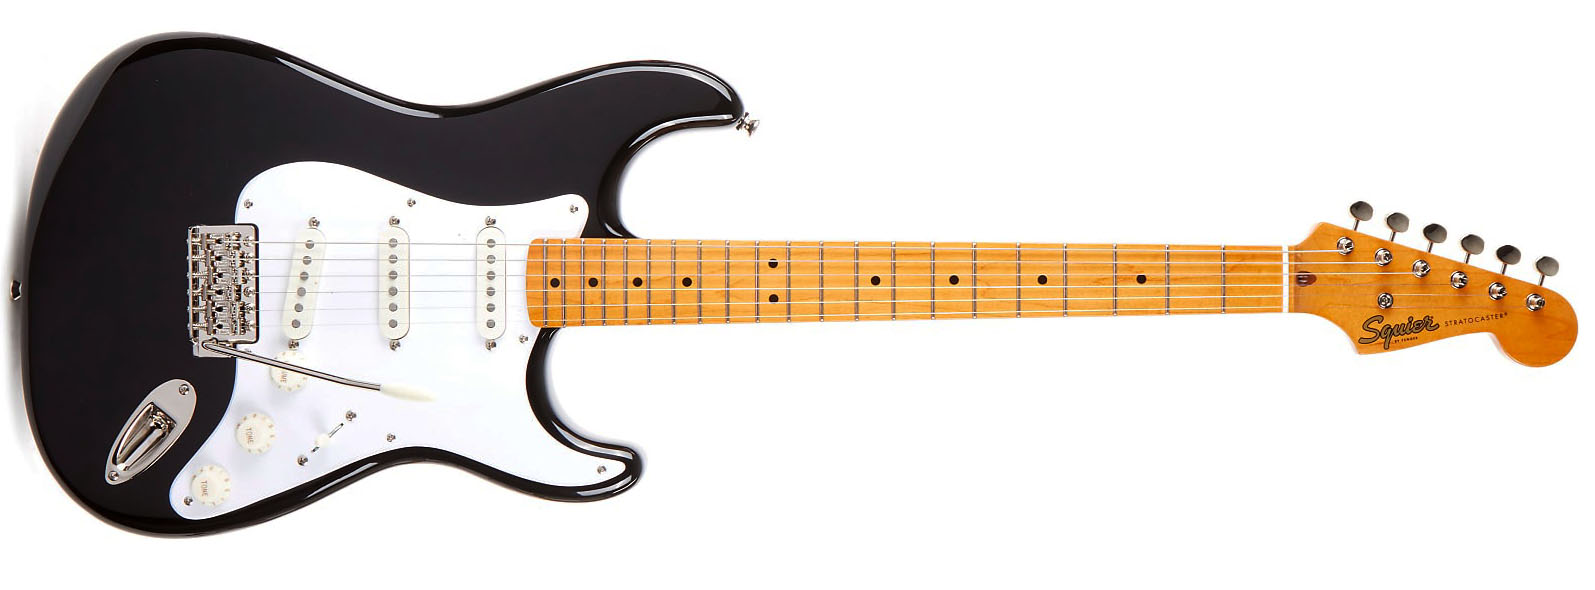
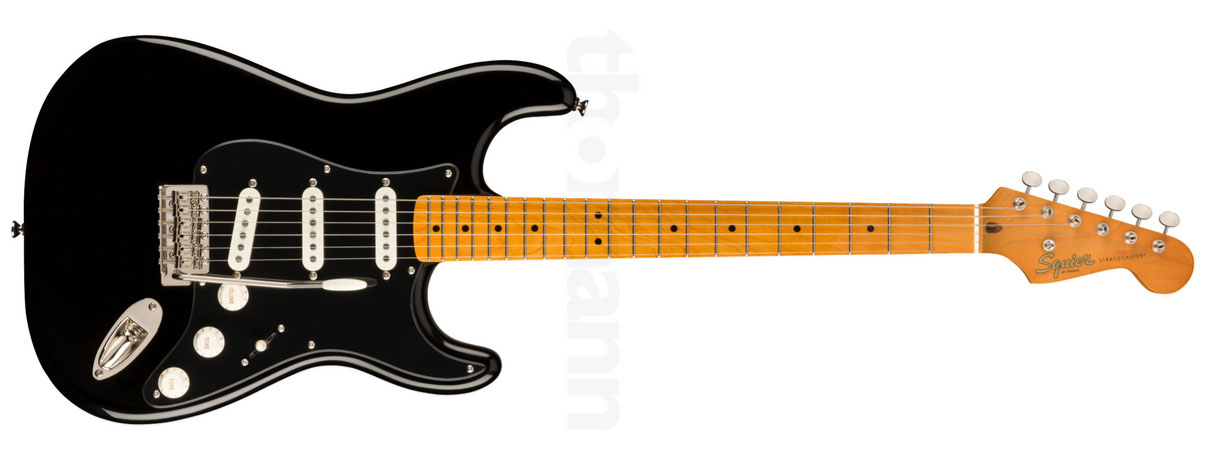
Fender Classic Vibe '50s Squire Series (left) and the same with a black pickguard (right)
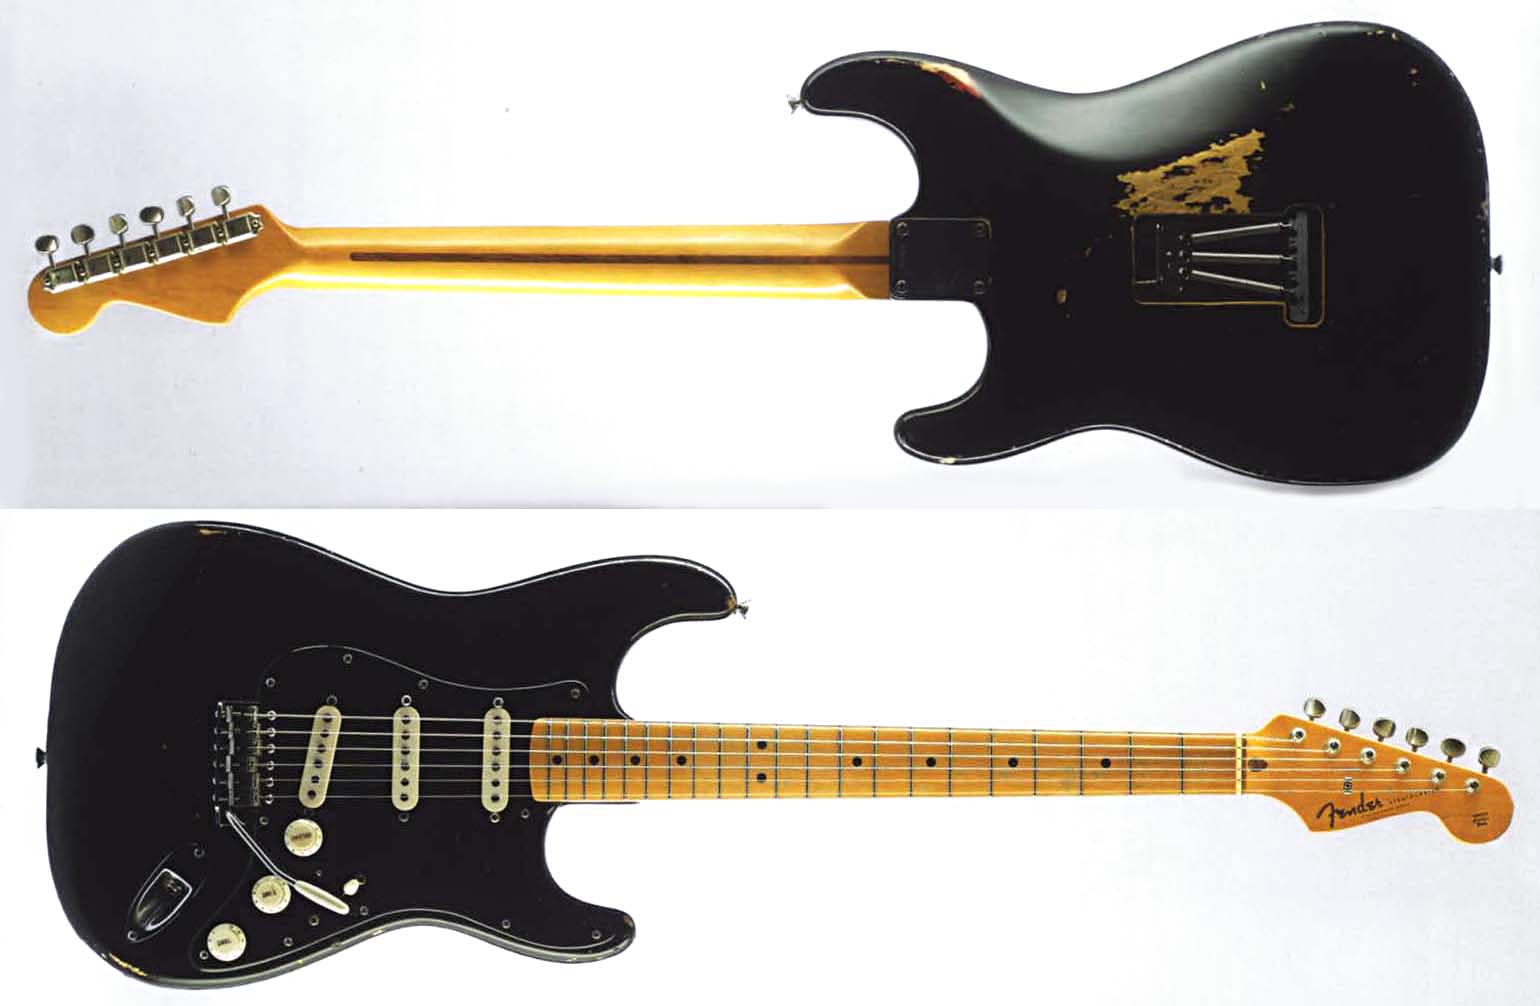
THE REAL BLACK STRAT OWNED BY DAVID GILMOUR (photos stolen from Phil Taylor's excellent book, The Black Strat)
PICKGUARD, KNOBS, AND TIPS
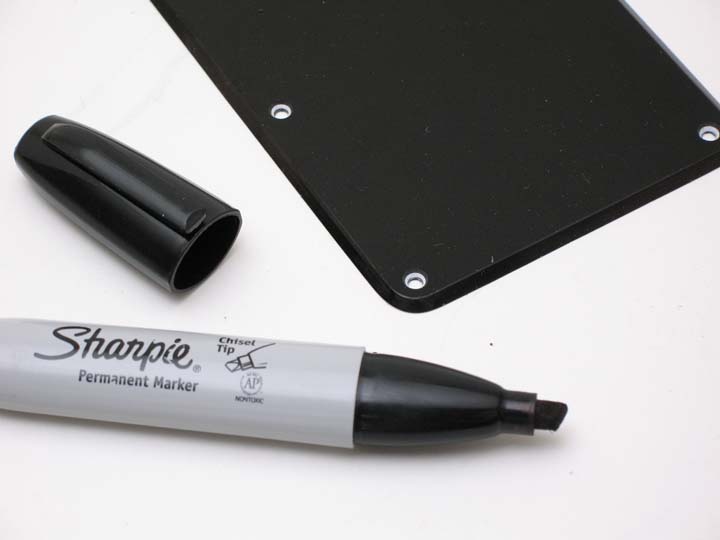
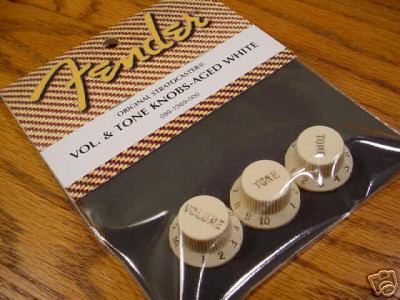
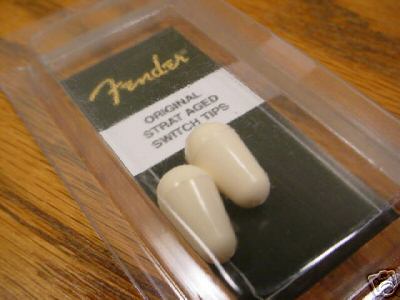
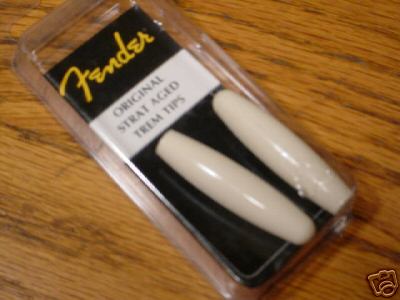
I purchased a black 3 ply pickguard, back cover, and “vintage” white pickup covers, knobs, trem tip, and switch tip from Guitar Parts Resource.com. I could not find an all black pick guard and back cover in stock at the time I built this (there are several suppliers of these though, if you scour the web), so I dyed the white edges black with several passes of a permanent black Sharpie Magnum marker. The Magnum appears to be a different formula than a standard Sharpie marker. Seems tacky, but once dry it is not sticky, does not come off, and if you use even passes it looks great.
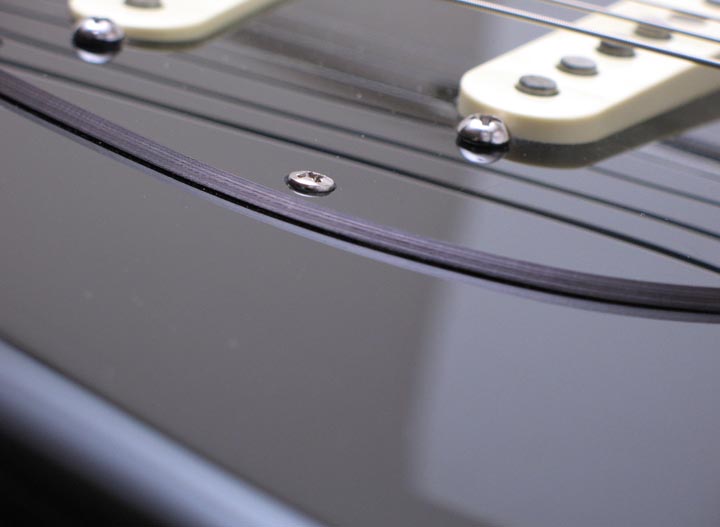
David's guitar has a 1 ply, all black acrylic pickguard with rounded and polished edges, and 11 holes. Since posting this article several websites have have popped up selling the pickguard, pickups, and other components to make a complete loaded Black Strat pickguard package. Overdrive Custom Guitar Works was one website, although the price is higher than sourcing all of the components yourself. David's knobs and switch tip are originals, so they are an aged cream color. The ink color on the knobs appears to be dark green.


TUNERS
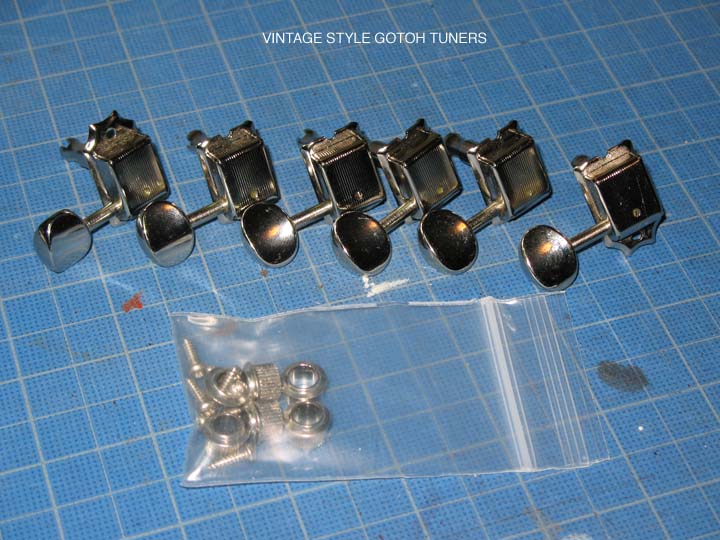
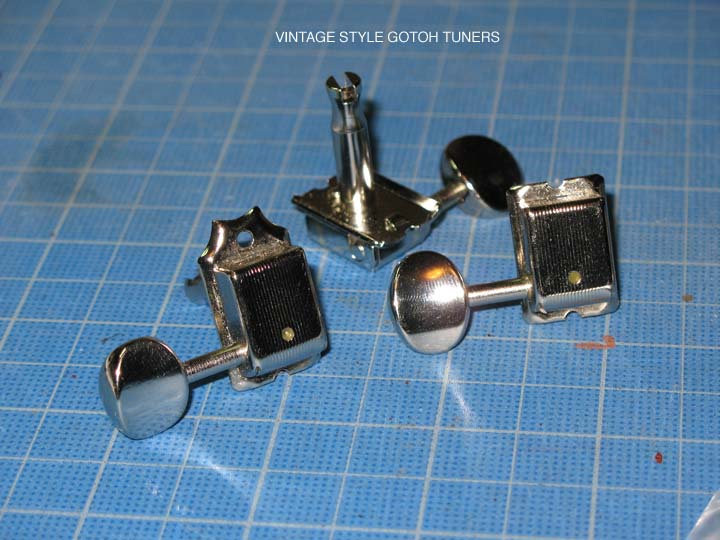
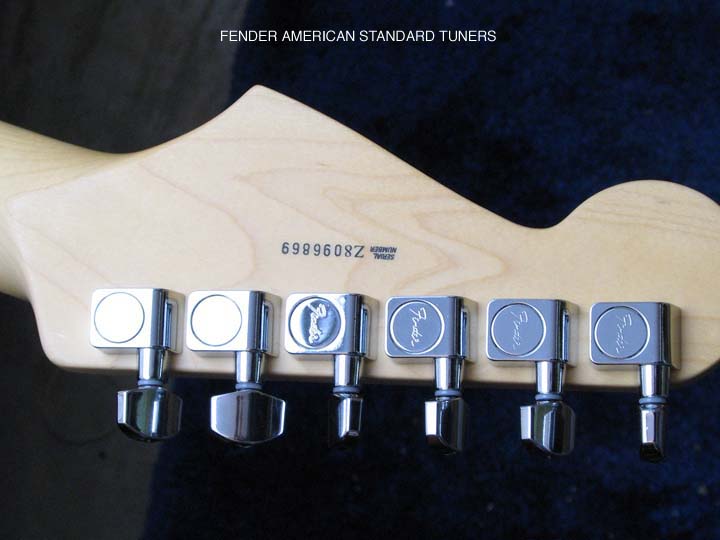
I bought a set of current “vintage” Gotoh tuners on ebay to replace the American standard tuners, but I ended up switching back to the standards. They are very similar working tuning machines, but the modern tuning machines on an American Strat seem to be a bit smoother and stay in place better that current Gotohs. Unless you like the look of the vintage style, and the vintage style slotted tops, there is no reason to change. I also prefer the string holes in modern tuning machines versus slots. Here are pix of the Gotohs on the left and Fender American standards on the right.
The tuning machines on David's Strat headstock are vintage Gotoh machines.
BRIDGE, SADDLES, AND TREMOLO BLOCK
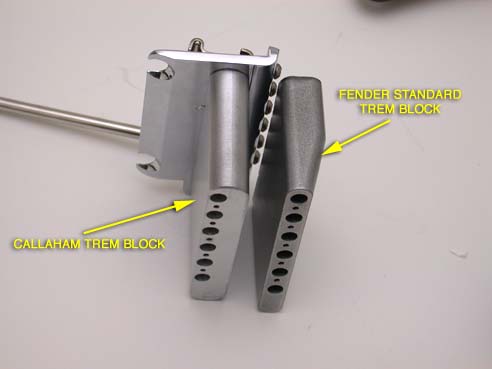
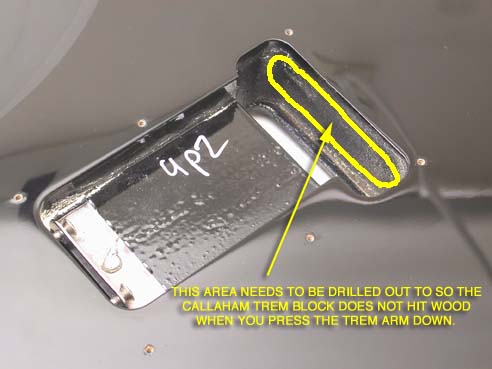
The standard Fender tremolo blocks are cast metal, with folded steel saddles. At the recommendation of others, I replaced the saddles and tremolo block with a Callaham made 2-point syncronized bridge and saddles from www.callahamguitars.com . Callaham also makes vintage 6-point bridges if you prefer that system. The Callaham block is cut from solid steel rather than cast, which supposedly allows the string vibration to resonate into the guitar body more. I had to drill out the wood in the trem cavity a bit (pictured in next section below) so I could press the trem arm all the way down without the Callaham block hitting wood inside. Callaham blocks are not beveled on the back side to allow this like the fender block, but they also have more dense solid metal than a Fender. If you like to be able to drop your trem arm all the way down so the strings go slack (Gilmour does this at the end of All Lovers Are Deranged and drops it in the intro to Sorrow), you may have to remove some wood here, as I have done. I used a sanding bit on my hand-held Dremel to route out the wood inside the block hole.
The tremolo bars fit loosely in some Fender tremolo blocks and audibly rattle when using them. Callaham blocks have a tight fitting plastic sleeve inside to prevent this, but there is also a simple fix to prevent the Fender arm from rattling. Some people suggest wrapping it in plumbers tape, but that does not last very long. A more effective solution is to use some electrical heat shrink tubing from a hardware store. 3/32" or 3/8" diameter tubing works. Cut a piece about 1/4" to 3/8" long and slide it onto the arm just above the threads. Use a lighter or heat gun to heat and shrink the tubing around the arm to create a thin plastic sleeve, then install in the tremolo block.
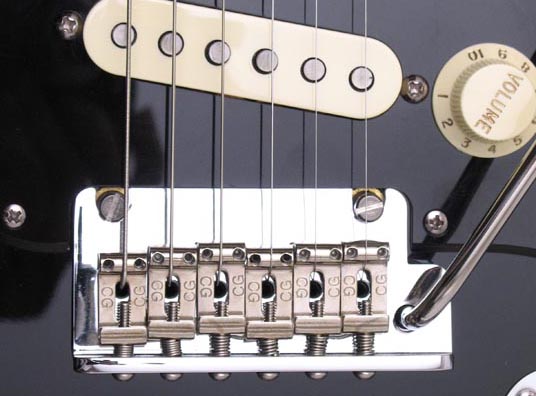
The stock Fender Am. Std. saddles are made with the string holes a bit too short and (supposedly) don't carry the string vibrations as well as the Callahams, which have larger holes. Both are stainless steel, bent and folded to shape. The better Callaham saddles are supposed to improve the tone and sustain, and the saddle height and intonation screws are also machined slightly better than the stock Fenders. I think the Callaham saddles did make a slight improvement, but overall the difference was marginal.

On the left below is a modern two-point Strat bridge. The Black Strat bridge is a vintage style 6-point syncronized tremolo with vintage saddles, as shown on the right.
SETTING UP THE TREMOLO AND SPRINGS
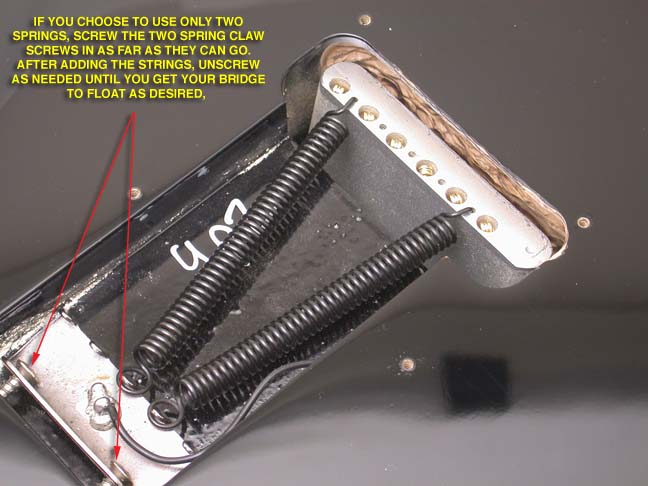
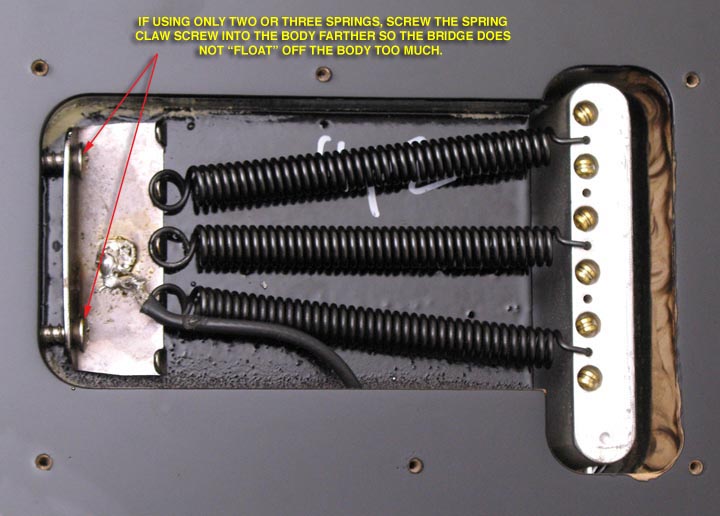
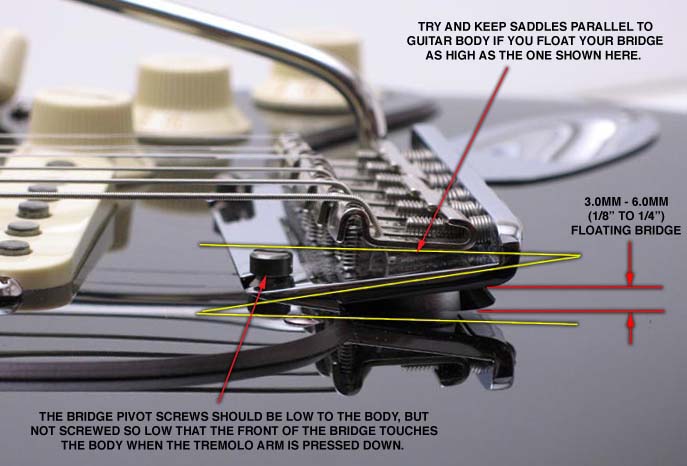
The setup of your Strat is a personal preference. I like my strings and tremolo bar VERY “squishy”, as in not tight, so I only use two or three tremolo springs on my strats to cut the spring tension, which in turn causes the string tension to pull the back end of the bridge plate way up. This is a “floating bridge”. Based on recordings, I believe Gilmour had the bridge plates resting on the bodies of his Strats in his early days with Pink Floyd up to the Dark Side of the Moon era. This allows pitching the notes down with the bar, but not up.
Around 1976 David began tightening the outer bridge plate screws down so the front of the bridge plate rested on the guitar body. The four inner screws were raised so they did not press down on the plate. The back of the bridge floated slightly off the body. This allowed pitching the notes up or down with the bar, creating a much deeper and wider tremolo effect that David became a master at using. He typically used three springs in his Strat in the studio, and four springs when playing live. Below is how David described setting up his tremolo in 2009, and this is how I set up mine.
These days, I typically use three springs. I like to let the bridge plate sit onto the body completely, and then I tighten up the six bridge screws until they sit perfectly on the top of that, without actually pressing down on it. Then, I tighten the strings up to get the right tension on them, and then I sometimes screw the screws that hold the springs at the back (the spring claw screws) deeper into the body until it gets exactly right. You can have those screws slightly looser and add a fourth spring, or you can remove another spring and tighten them up a little bit. - Guitar Player interview 2009
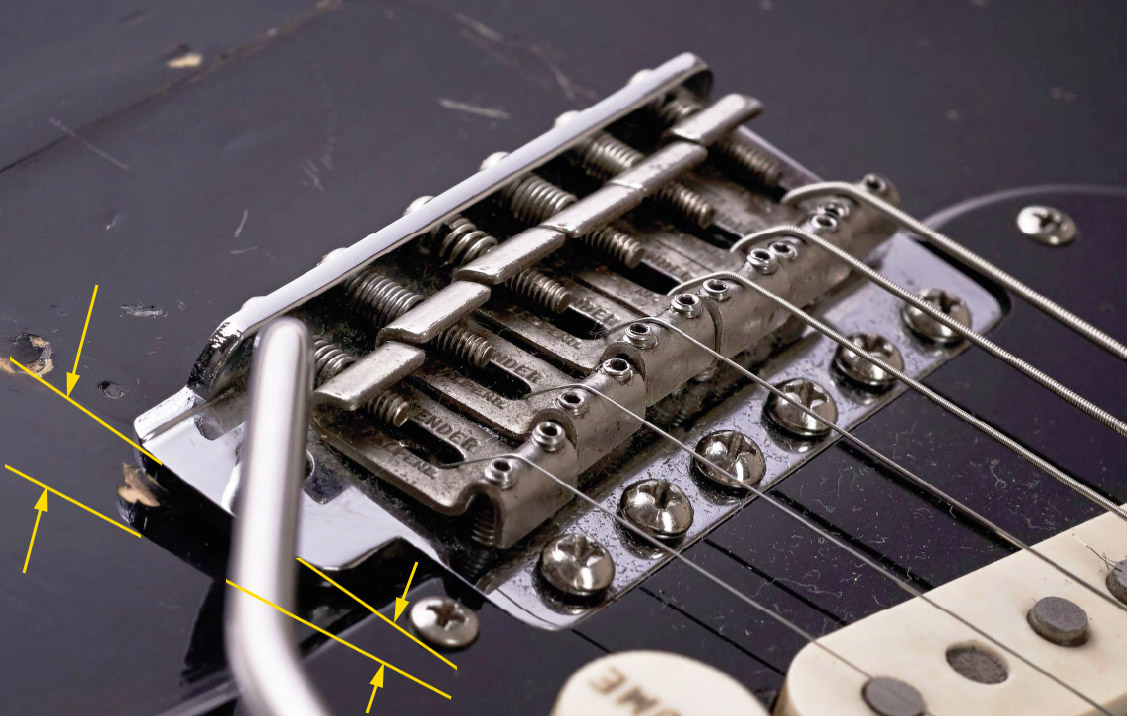
Photos from around 2006-2014 (shown above) and in the Black Strat book show the bridge plate still rests fairly close to the body, with the back raised about 1.5mm. The bridge on his red EMG Strat was set up the same way. Gilmour stated in the January 2009 issue of Guitar Player that his current strat bridge has three springs. If you watch him playing in the 2006 Remember That Night DVD, he does not seem to use the trem as much as he did in the '80s and '90s, but when he does it appears to be fairly tight, so he was probably still using four springs when playing live, as he had been doing since the late 1970s.
HOW TO SET UP A FLOATING BRIDGE - I keep the 2-point screws that the bridge pivots on set very low, so the front of the bridge is flush with the guitar body. If your strat is a six point (six screws), you may want to raise the four inner screws slightly higher thatn the outer screws for a floating bridge. Most people will want to have the back of the bridge plate no more than 3mm (1/8“) off the guitar body for a floating bridge. I like mine high, around 5-6mm (1/4”).
I tighten the two 2" screws that hold the spring claw deep into the wood body to tighten the springs. It is a balancing act between the string tension and the spring tension. I jack the string height up with the saddle screws to compensate for having only a few springs, and also because I like the strings set high above the fret board. Doing this I can get the saddles back parallel with the guitar body and stay in tune. When I set the strings up high, Fender saddle screws sometimes go crooked because the screw threading is not done very well. Callahams screws are slightly better.
I have talked to many people who have serious problems with staying in tune when using a floating bridge like this. I am baffled by this as I have never encountered that problem, and rarely have to tune my Strats. The only string I find sometimes goes out of tune when doing deep bends is the G string. The beauty of the floating bridge is that you only have to pull up on the tremolo bar slightly and the G goes back into tune. I believe any tuning problems are probably more associated with nut binding, bad saddles that bind or snag strings because of poor surface finishing, bad or incorrect string wrapping around the tuning pegs, or simply not stretching the strings properly after restringing the guitar.


HOW TO SET UP A NON-FLOATING BRIDGE - In theory, you will get more sustain if the bridge plate is flat and resting on the body, due to the increased resonance of the strings vibrating through the guitar body because of the solid contact. That can also make the sound thin or tinny on some Strats. I say “in theory” because I get plenty of sustain and my bridge plates have always been floating quite high off the body. If you do not want the trem plate to float, there are two common ways to set up a non-floating trem - completely flat on the body, or slightly raised on the pivot end. I don't recommend having the whole plate flat. Strats sound better to me if they are raised a bit on the pivot end. I think that is what makes a Strat sound stratty, but it varies from Strat to Strat.
Most people use 3-5 springs for a non floating bridge. I would not use less than 3. Loosen the strings about 1 1/2 turns. Tighten the two spring claw screws in the spring cavity on the back of the guitar until the trem plate on front is flush with the guitar body. Then tune up again. If the trem plate pulls up as the string tension increases, you can tighten the claw screws more, or even add another trem spring if you only have three. After you get that balance worked out and the back of the trem is flush or touching the guitar body, bend the high E up to the low E string at the 12 fret. The plate should not lift, or barely lift. If it still lifts when bending strings, repeat the above steps until you get it relatively non floating.
Look at the the screws the bridge trem plate pivots on. If the screw pivot end of the plate is floating off the wood a bit, you can turn the screws in more to get the entire plate resting flat on the guitar, or not. I would keep it at least 0.2-0.5mm off the body on the pivot end, though the other end of the plate can be touching the body. To adjust the pivot screws, raise all the middle screws a few mm so the are not contacting the plate. Use the two outer screws to raise or lower the plate, turning the same on each so the plate is not higher on one side than the other. Then turn all the middle screws so they are the same height as the outer. Try it completely flat, or up a bit on the pivot side and see which you prefer. Keep in mind, if you adjust the pivot screw height, you will change the string height, and likely change the guitars intonation. You will need to adjust the two saddle height screws on each saddle, and recheck the guitar intonation. Recheck the intonation anyway, even if you do not adjust the pivot screw height.
TIP - If you have a flush mounted, non floating tremolo bridge, and you find your guitar tone sounds a bit thin or tinny, try raising the pivot screws just a hair or two. Actual contact of the bridge plate to the guitar body can thin out the tone on some strats. The guitar does not really need the bridge plate to have contact with the body for the strings vibrations to resonate through it. The close proximity of the bridge to the body, and the fixed contact of the pivot screws handle that job just fine, and I believe that is what makes a Strat sound like a Strat. Keep in mind the string height will be raised when you raise the bridge, so adjust the two saddle height screws on each saddle. Recheck the guitar intonation and adjust if needed.
TIP - Have you noticed the tremolo springs can become creaky and noisy, to such a degree that you can hear it through your amp? The creaking, poppy pings may sound like they are coming from the tremolo springs, but this is likely the strings sticking in the nut slot at the end of the neck. When the strings slide through the nut slot they can jam and stick over time as they move and cut deeper into the slot, creating a noise which vibrates all the way through the tremolo block and into the tremolo springs. The simple solution, and something you should do periodically anyway, is to put a dab of lubricant under the strings in the nut notches. Liquid graphite works, or try a mix of vasoline and #2 pencil lead shavings which will last much longer. There are also a wax and graphite nut lubricants available. If your tremolo springs sometimes make a reverby "ping" sound, you can deaden that noise by inserting some fish tank air tube inside the spring coil. Another option is to pull a piece of packing foam rubber through the spring coil using a guitar string as a loop to pull it through. Either of those solution dampens the resonant sound springs can produce, though some people actually prefer it and think it makes a Strat sound stratty.

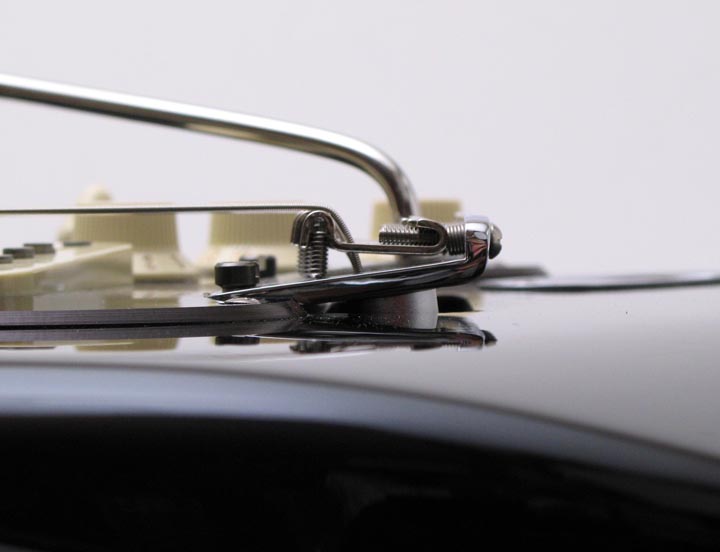
Shown below is David's Black Strat bridge from 2014, with the back raised about 1.5mm off the body.
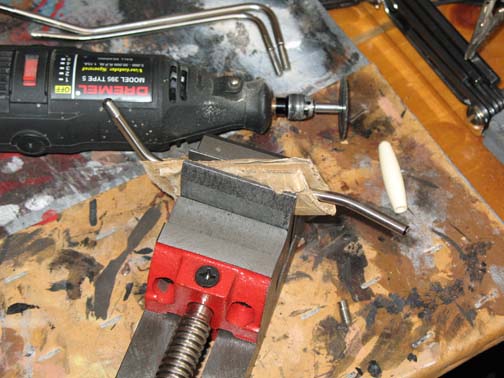
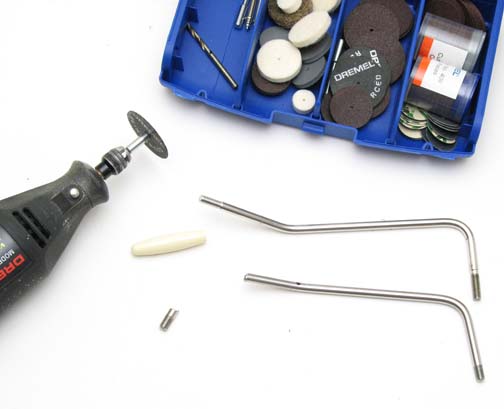
CHOPPING THE TREMOLO ARM
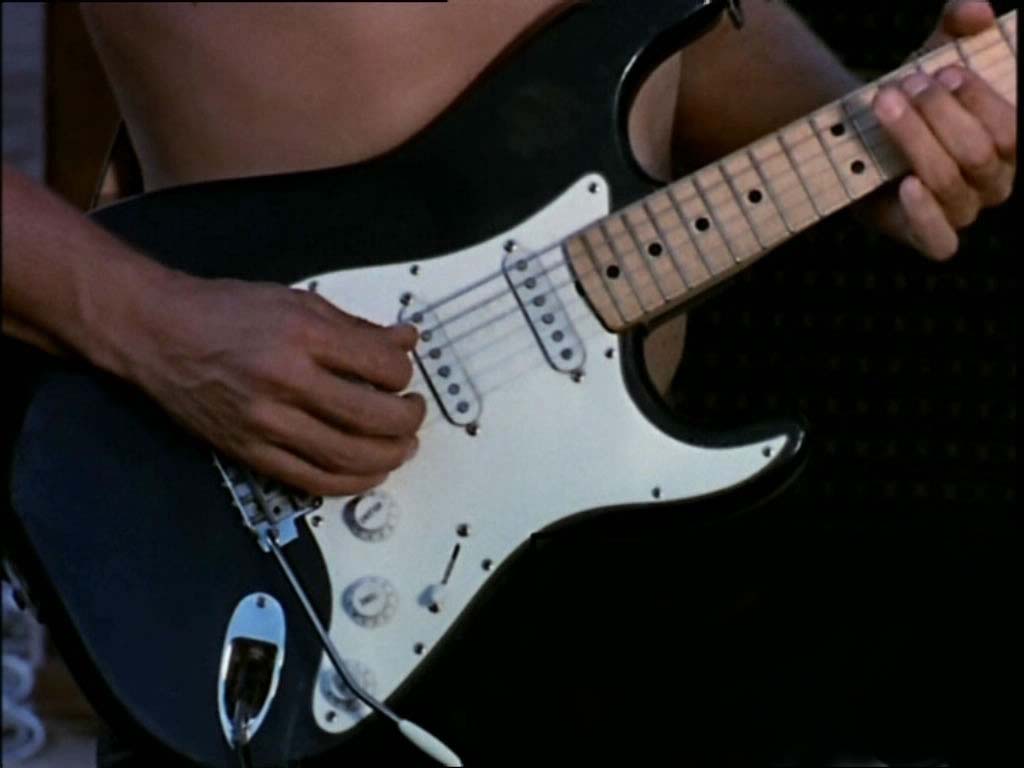
I cut my tremolo (or whammy) arm short, about 133mm (5 1/4“), to fit in my palm when playing. Davids is cut to 45mm. My first guitar was already set up like this, so I have always shortened them, and Gilmour does this too. If it is the right length you can grasp it with your pinky and third finger while holding the pick with your other two fingers and it does not interfere with normal playing like a longer stock trem arm will. If you do this, check where your hand normally rests over the pickups when you play and measure the trem arm from the bend almost to the center of your palm to see how far to shorten it. Keep in mind the plastic tip will add some length after you re-attach it, so stick a piece of wire into the tip hole to determine how far the trem arm extends into it before you cut. Tips are usually 6mm (1/4”) longer than the trem arm.
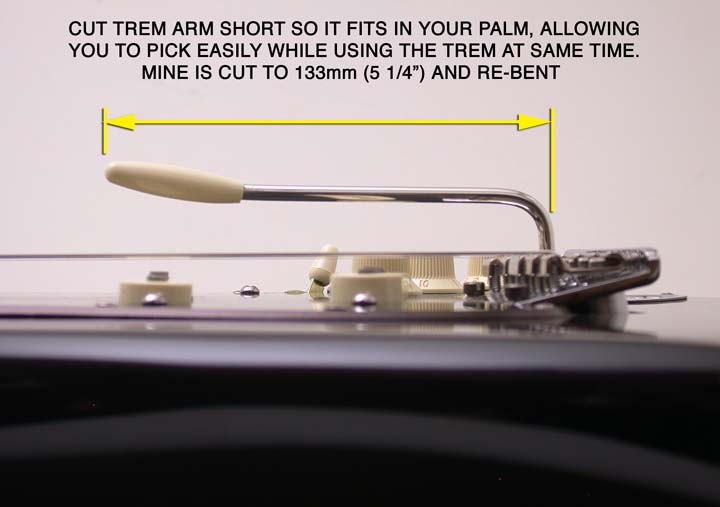
Unscrew the plastic trem tip from the bar and mark your distance, adding to what you measured to compensate for the added plastic tip length. Lock the arm in a vice but be sure to wrap the arm in a piece of leather, rubber, or rag so the vice does not scratch it. You can cut it with a steel saw, or use a Dremel tool or similar hand held device (wear eye protection!). I used a steel disk cutter with a Dremel tool. I also ground the sharp edges down after the cut with a sanding bit. You won't have any threads to screw the plastic tip back on after cutting it short, but you can glue it back on with a good two part epoxy, or heat the end of the trem arm with a flame for a minute, then push the tip back on tight. I put a small spring in the bottom of my trem arm hole to prevent it from screwing in too low in the Callaham block. That adds to the resistance and helps keep the bar from coming loose over time (If you do this, DON'T use a spring that is too large or it can jam in the screw threads and strip them). I also bent my trem arm up slightly in a vice to keep it roughly parallel with the guitar body because my floating bridge is angled high, but most people will not need to do this. Be aware that most trem arms are hardened steel, so if you do re-bend, do it slowly or you may risk breaking the bar.

PICKUPS
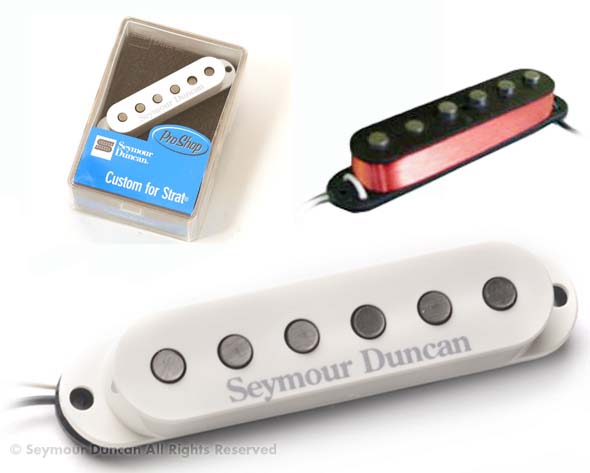
I wanted to replace the weak sounding Fender standard pickups with more Gilmourish sounding pickups. Gilmour currently (as of 2007) uses original late 1960s Fender pickups in his neck and middle positions, and a custom wound Seymour Duncan SSL-1 pickup in the bridge position. The bridge pickup DC resistance is 12.16k Ohms, middle 5.57k Ohms, and neck 5.42k Ohms. David has also used a DiMarzio FS-1 bridge pickup in this Strat from 1976-1978 with a DC resistance of 14.23k Ohms. Both of those are very "hot" sounding bridge pickups that work very well with Big Muffs and fuzz pedals.
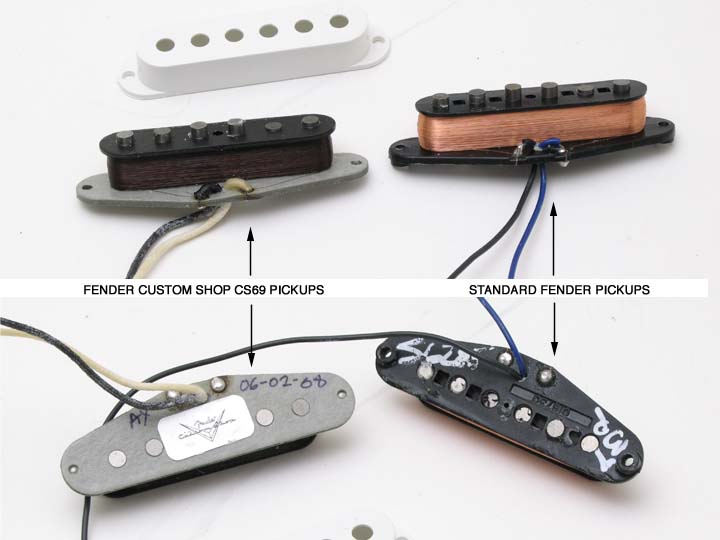
The Fender Signature Series Black Strat is made with a "hand wound" Fat 50s pickup in the neck and a Seymour Duncan SSL-5 in the bridge position. It is actually an SSL-1C, but the only difference between the SSL-5 and SSL-1C is the shape of the flatwork on the bottom of the pickup (the actual pickup is marked with both SSL-1C DG and SSL-5). The middle pickup in the Signature Strat is a bit confusing, since Fender specs originally stated it was a CS69, then later revised to a "Custom Wound Strat " pickup. Resistance/output measurements indicate it is actually the exact same pickup as a CS69, and is not RWRP. The only difference is the flatwork on a CS69 is gray colored, but it is black on the one in the signature Strat.
I opted to use the SSL-5 for the bridge because it is identical to the the custom wound SSL-1 pickup in the real Black Strat, and it's the pickups used in the Fender Black Strat replica. I also tried Fender Fat 50s and CS 69 pickups in the bridge position, which sound great, but the SSL-5 is exactly what I was looking for and had that in-your-face intesity I liked. The SSL-5 turned out to be a fantastic pickup, and I recommend it for any Strat. The high output really helps with sustain and getting those subtle harmonics needed for good Gilmour tones.
For the neck pickup I tried Fender Fat 50s, CS 54, and CS 69 pickups. They are all in the same vintage tone family, but each sounds slightly different. The Fat 50s have a bit more output and maybe a bit more mid range than the 69s. The CS 54s fall somewhere in between. I liked the 69 sound when the Strat was in position four better than the 50s, but for pure bluesy neck tone, the 50s is a bit "fatter" sounding than the 69. The CS 69's worked best for me, so I used those in the neck and middle positions. The middle pickup was not as critical to me because I only ever use it in conjunction with the neck pup in position #2 when I play clean rhythms.
 ...
...
PICKUP SELECTOR SWITCH - Pickup selector switches were always a three-position switch until Fender started offering a 5-position switch around 1977 that made it easier to combine the middle and bridge pickup (position 2), or the middle and neck pickup (position 4). The Black Strat originally had a 3-position switch, but in 1985 it was changed to a 5-position, and the Signature Series Black Strats also have a 5-position switch.
I put one of the tone controls on the treble pickup. I stole it from the middle pickup because I don't use the middle pickup very often and I liked to have a tone control on the treble pickup - David Gilmour Guitar Player interview from 1979
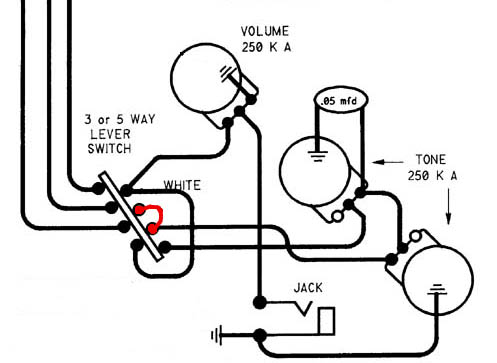
TONE CONTROLS - The Black Strat tone controls were originally wired the traditional way with the upper tone control wired to the neck pickup and the lower one wired to the middle pickup. At some point in 1979 or earlier David added a jumper wire to the pickup selector that made the middle tone pot function for both the middle and bridge pickups. The mod was removed at some point, and it does not appear on the Fender Signature series replicas. I have used Strats with the bridge wired to the tone pot, but never used it, so I did not make this mod on my Black Strat. If you want the bridge tone control, simply add a jumper wire between the two pickup selector lugs shown in red in the drawing below.
RWRP OR NOT? - Seymour Duncan popularized making the middle pickup in a Strat reverse wound and reverse polarity (RWRP) of the other two, giving pickup selector positions 2 and 4 a softer, brighter sound and an upper mid range notch. It also cancelled out the hum noise in positions 2 and 4. Because of the popularity of this mod, Fender began offering Strats with RWRP middle pickups around 1982-83, and now most Strats are made this way, so you may want this feature in your Black Strat. Gilmour's Black Strat was made long before RWRP, so all three pickups in the real Black Strat and the Signature Series Black Strats have the same pickup winding direction and same magnet polarity.
Fender CS 69 pickups are the same for all three positions, so there is no RWRP middle pickup. The middle pickup in a Fat 50s set is RWRP. Seymour Duncan's pickup wind and polarity are opposite of Fender, so if you have a Fender RWRP middle pickup, you want the SSL-5 RWRP version for the bridge. If your Fender middle pickup is not RWRP, you want the standard SSL-5 for the bridge. The SSL-5 was available in both RWRP and a standard versions at the time I wrote this article. I opted not to do the RWRP middle pickup.
I found the Fender CS '69 pickups at Musician's Friend (www.musiciansfriend.com). Other sites had them for less money, but Musicians Friend was the only place found that actually stocked them at the time. The best price I found for the Seymour Duncan #999999 Overdrive Custom Guitar Works is one website, though the prices are higher than sourcing the individual components yourself.
UNDERSTANDING POLARITY AND PHASE WHEN WIRING PICKUPS - In general most modern Strats have the middle pickup reverse wind and reverse polarity (RWRP) of the other two pickups, which have normal wind and polarity. This allows both pickups to be IN PHASE in positions 2 and 4 on a 5-way pickup selector, which creates hum noise cancellation. If the middle pickup is not reverse wound or is not reverse polarity, positions 2 and 4 will be OUT OF PHASE, which creates a thin sounding tone, possible volume mismatch against the other pickup positions, and allows hum noise.
For two pickups to be in phase, both must have identical coil wind direction and identical magnet pole polarity, or one must have the opposite wind direction and polarity of the other. If both have the same polarity, but the wind is opposite in one, they will be out of phase. If both have the same wind direction, but the polarity is different in one, they will be out of phase. This is why you usually want a normal neck pickup, RWRP middle pickup, and normal bridge pickup.
However, it can get confusing when mixing pickups from different manufacturers. Why? RWRP can be the opposite from one manufacturer as it is to another. This problem occurs with Seymour Duncan and Fender pickups. Most standard SD pickups, like the SSL-5, have the same wind and polarity as a Fender RWRP pickup. So if you add a standard SSL-5 in the bridge position, and the middle position is a RWRP Fender pickup, they will be out of phase. Fortunately SD makes an RWRP SSL-5, which is actually normal wind and polarity in Fender's world. So if you have a RWRP Fender middle pickup, you need an RWRP SSL-5 Seymour Duncan pickup in the bridge position, not the normal SSL-5. If you have a normal Fender middle pickup, you need the standard SSL-5 bridge pickup.
If you are unsure what you have, you can check the polarity of two pickups by placing the top of one against the top of the other, pole pieces touching. If they attract each other, they are opposite polarity.
GIMOUR NECK TOGGLE SWITCH - I have not decided if I will do the Gilmour neck toggle switch mod, which is a switch to combine the neck pickup with the bridge or middle pickups. I'm not sure I would ever use it. I have a similar switch setup on my Brian May Red Special guitar and don't care for it. For me, the standard five position pickup selector has every pickup tone I would ever want, and is more than capable of getting all of the Gilmour tones. The rumor that David used it on the first Comfortably Numb solo, is just that, and I think it is dead wrong. In 2009 when David was asked by Barry Cleveland if the neck mini-toggle switch was a staple part of his sound and recognizable on a lot of songs, David said this -
No. I’m not sure I’ve ever used it [laughs]. The neck pickup along with the bridge pickup has that particular in-between sound, and you can also get all three pickups on at once if you want to. It basically lets you get a Jazzmaster tone out of a Stratocaster. I play with it, but I don’t remember when I’ve used it on a record. - David Gilmour Guitar Player January 2009
EDIT - I did eventually add the neck toggle switch. After messing around with it for a few weeks, I found that I never used it again. None of the added pickup combinations really sound any better or usuable to me than the tones I get form the standard 5 position pickup selector. Another issue is that adding the neck to the bridge pickup nearly cancels out the subtle pick+thumb harmonics that are key to mach of Gilmour's solo playing. I think that is probably why David rarely, if ever, used it.